Struggling to record clear podcasts without expensive tools? Podcasting has become an incredibly popular medium for storytelling, education, and entertainment. Audacity, a free, open-source audio editor, offers a user-friendly platform for recording and editing podcasts without the high cost.
However, despite its popularity and accessibility, Audacity for podcasts does have limitations that can restrict users from achieving truly polished, professional-sounding podcasts. In this article, we will explore how to utilize Audacity effectively for recording and editing podcasts.
Part 1. Utilizing Audacity for Podcast Recording
Audacity podcast software is an open-source audio editing software that has been used by podcasters and voice artists for recording audio. Its versatility in features and ease of use make it an ideal choice for beginners and professional users who want to produce quality podcasts without financial investments.
Top Features Offered by Audacity
Multi-Track Recording
Audacity's multi-track recording lets podcasters record multiple audio inputs or separate audio clips on different tracks in the same project. Users can add, remove, and rearrange tracks as needed, and adjust volume, pan, and mute settings per track.
Basic Editing Tool
The tool offers fundamental editing tools for cutting, trimming, splitting, copying, and pasting audio clips. Users can rearrange clips on tracks, fix mistakes, and improve pacing easily.
Effects Library
The Effects library of the Audacity podcast editing tool includes a pitch, phaser, and distortion remover to help clean up hums and balance sound levels. Although often requiring manual fine-tuning, the available effects allow podcasters to improve audio quality significantly.
Audio Analyzing Tool
Audacity provides audio analysis tools such as plot, spectrogram, and beat finder. Analysis tools aid in achieving clearer, balanced podcast audio through precise editing and effect application.
Using Audacity For Podcast Recording: A Complete Guide
Having discussed the functionalities of this audio recording tool, let's have a look at the step-by-step guide on how to record and edit a podcast in Audacity:
Step 1
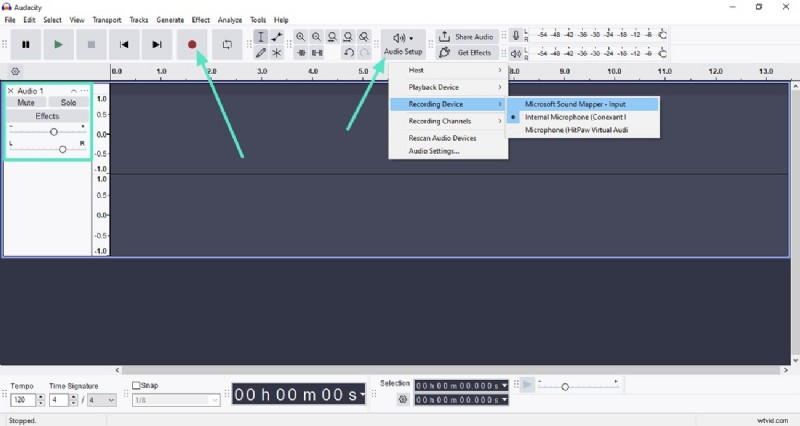
Set Up Recording Settings and Record
- Launch Audacity and choose "Audio Setup" from the ribbon. Head to the left panel and select the audio channel.
- Adjust the "Volume" and "Pan" by dragging the sliders. Once the configurations are made, click on the "Red" record icon.
Step 2
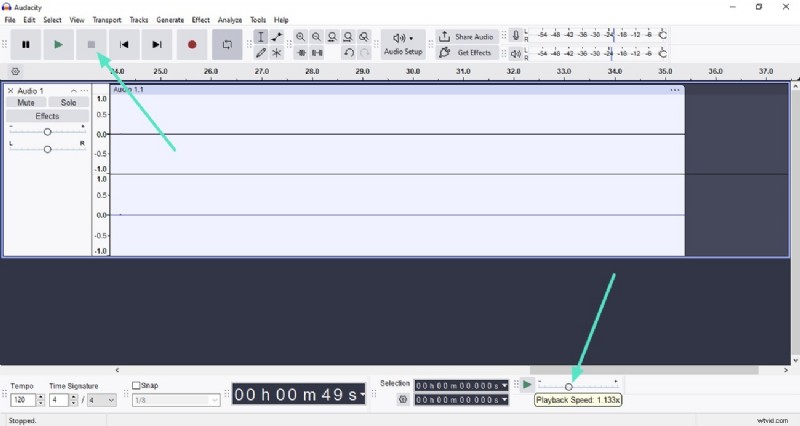
Stop Recording and Change Playback Speed
- Use the "Stop" button to abort the recording. Head to the bottom and drag the slider to adjust the speed.
- You can change the "Tempo" and time stamp using the designated options.
Step 3
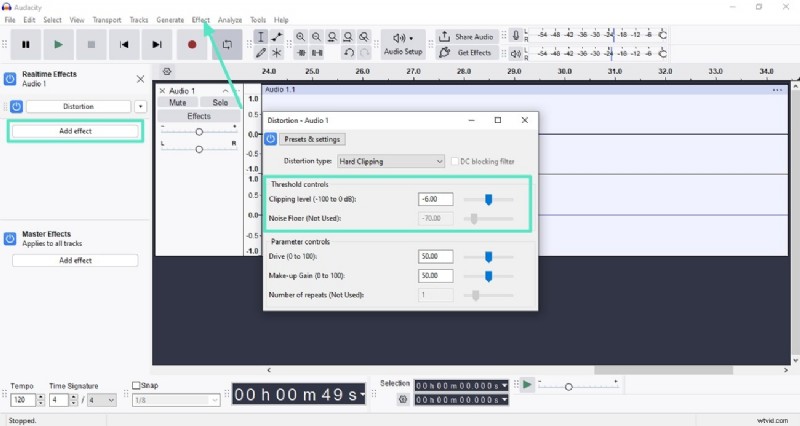
Improve Audio Quality With Audio Effects
- Access the top menu bar of Audacity Podcast software for the "Effects" section.
- Click on the "Add Effects" button and choose your desired effect. Configure the effects settings, such as "Clipping level" and "Noise Control."
Step 4
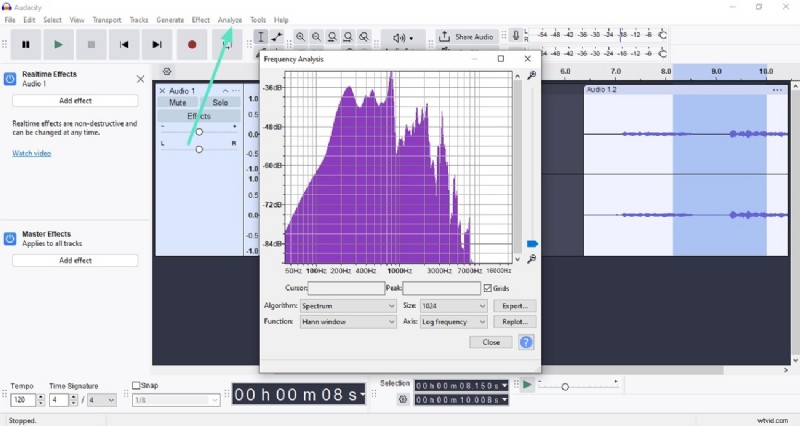
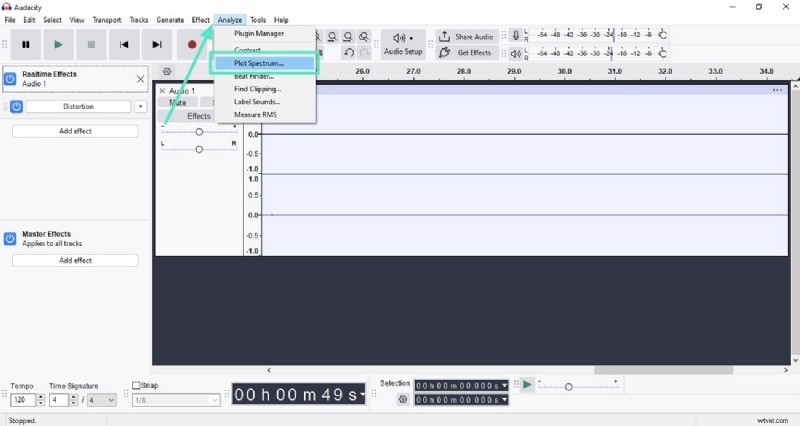
Enable Audio Analyzer
- Head to the menu bar and click on the "Analyze" option. Select the analysis tool according to your preferences.
Step 5
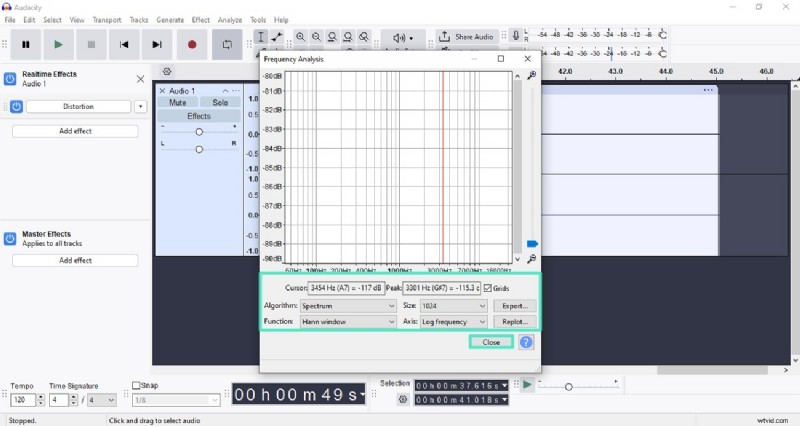
Review and Adjust Analyzer
- Preview the "Frequency Analysis" and adjust it before pressing "Close."
- You can analyze each part of the recording according to your preferences.
Step 6
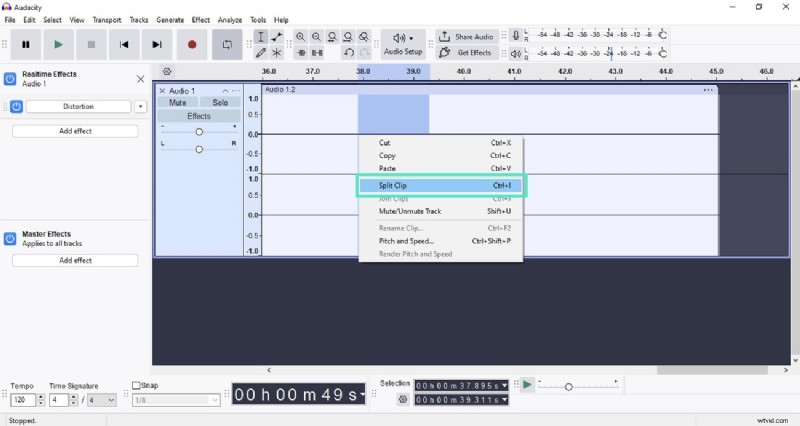
Remove Unwanted Podcast Recording
- Select the part you want to remove by selecting the area within the Audacity podcast tool.
- Now, right-click on it and choose the "Split Clip" option. Once the section is isolated, press the "Delete" key.
Step 7
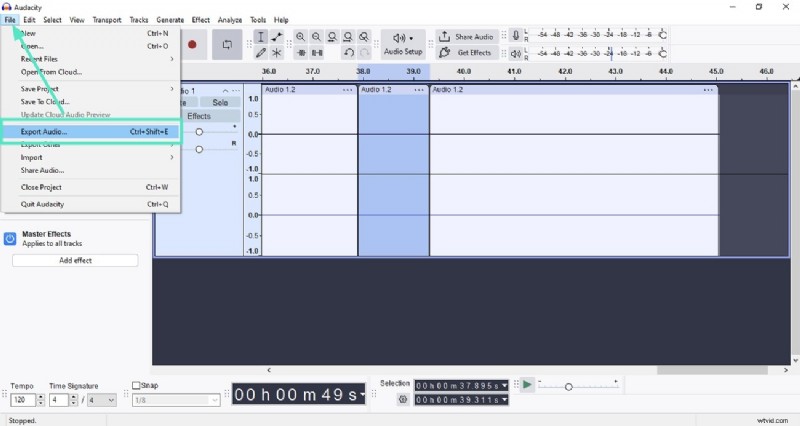
Export the Final Audio from Audacity
- Once all the editing is done, head to the menu bar and press "File."
- Finally, hit the "Export" option to save the results.
Part 2. Why Audacity is Not The Best For All-in-One Podcast Editing
While Audacity for podcast recording offers plenty of utility for starting podcasters, its limitations become apparent when looking for an all-in-one platform capable of professional-level podcast production. Some common pain points users experience with Audacity include:
- Limited Editing Diversity: Audacity's editing and effect options don't support advanced audio polishing. This limits the ability to produce a broadcast-ready podcast with rich sonic texture.
- No Video Support: Modern podcasters often produce video podcasts for platforms like YouTube or streaming audiences. Audacity is solely an audio editor with no capability to handle video tracks, sync audio and video, or provide visual editing tools.
- Steep Learning Curve: Despite its simple interface, many beginners find Audacity's menus and workflow confusing. The key features are hidden in dropdowns, and there is limited guidance or tutorials integrated into the software itself.
- Outdated Interface: Audacity's interface has remained largely unchanged over the years. The design of the Audacity podcast editing tool feels less intuitive and visually dated compared to newer tools.
- No Built-in Content Distribution or Publishing: The tool lacks direct integration with distribution and feed management tools. This adds an extra step and complexity to the production process.
- Lack of Automation: The tool does not provide any automated or AI-powered features that automate the podcast generation process.
Part 3. How to Overcome Audacity's Limitations for Perfect Podcasts
Due to the limitations of Audacity, podcasters look for seamless, professional-quality productions to overcome these deficits. One such tool that offers various audio and video creation functions is Wondershare Filmora. With a collection of audio and video enhancement options, you can easily generate compelling content for your podcast.

 Secure Download
Filmora's modern design and integrated features provide practical solutions for podcasters challenged by Audacity for podcast's restrictions. Here's how Filmora remedies each major pain point of Audacity:
Pain Point #1: Limited Editing Diversity
Many podcasters find Audacity's editing options basic and insufficient for creating a polished, professional sound with rich audio dynamics.
Remedy #1: Advanced Audio Editing and Effects in Filmora
- Filmora offers a comprehensive set of AI-powered audio tools to overcome these limitations.
- Its AI Audio Denoise automatically removes background noise like wind, hum, and hiss.
- The Equalizer presets provide tailored sound profiles to enhance vocal clarity or add warmth.
- Audio Ducking intelligently lowers background music volume when speech is detected.
- It includes automatic volume leveling and other functions that are accessible through an intuitive interface.
How to Enhance Audio with Filmora
Step 1
Add Your Audio File Into Filmora
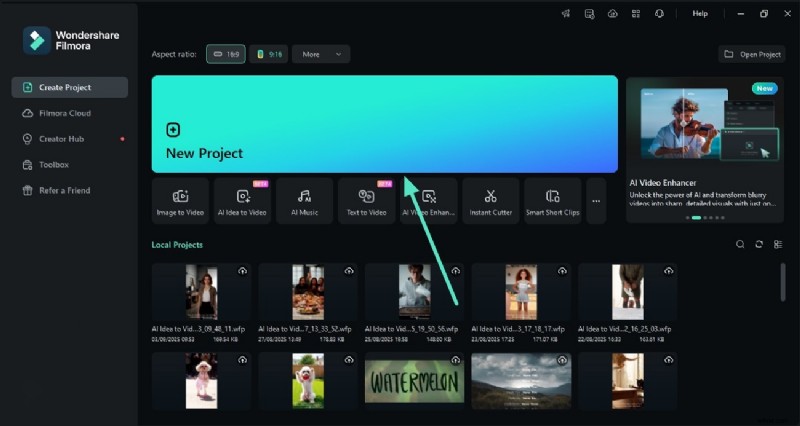
- After you have launched Filmora, head to the homepage and press the "New Project" option.
- Now, import your recorded audio podcast to the tool's interface and drag it to the editing timeline.
Step 2
Enhance Your Podcast Audio With Filmora
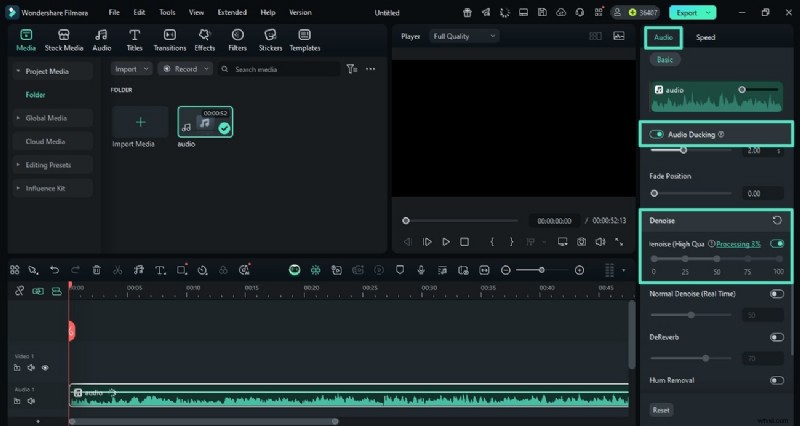
- Once the audio is added, head to the "Audio" panel and turn on the toggle for the "AI Denoise" option.
- Next, turn the toggle on for "Audio Ducking" to make the spoken words clearer.
Step 3
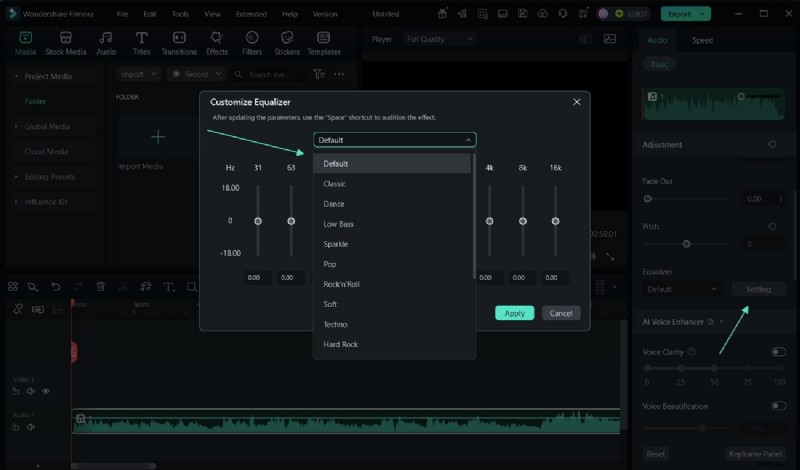
Equalize Podcast Audio Across Channels
- Scroll through the "Audio" panel and choose the "Equalizer" by expanding the dropdown menu.
- With the "Settings" option, the "Customize Equalizer" screen opens where you can make necessary adjustments.
Pain Point #2: No Video Support
Audacity podcast software does not provide support for video integration, which is an inconvenience for video podcasters.
Remedy #2: Convert Your Audio Podcast into Video
- Filmora is an all-in-one multimedia editor that allows users to generate visual and audio content.
- The AI Idea-to-Video feature automatically generates scripts for your podcasts and then converts them into video scenes.
- Professionally designed video templates for podcast intros, outros, lower-thirds, and visual effects.
- Apply various video enhancement elements such as effects and filters to create visually compelling results.
Secure Download
Simple Steps to Create a Video Podcast in Filmora:
Step 1
Choose the Text to Video Feature
- After launching Filmora, head to the homepage and select the "AI Idea to Video" feature.

Step 2
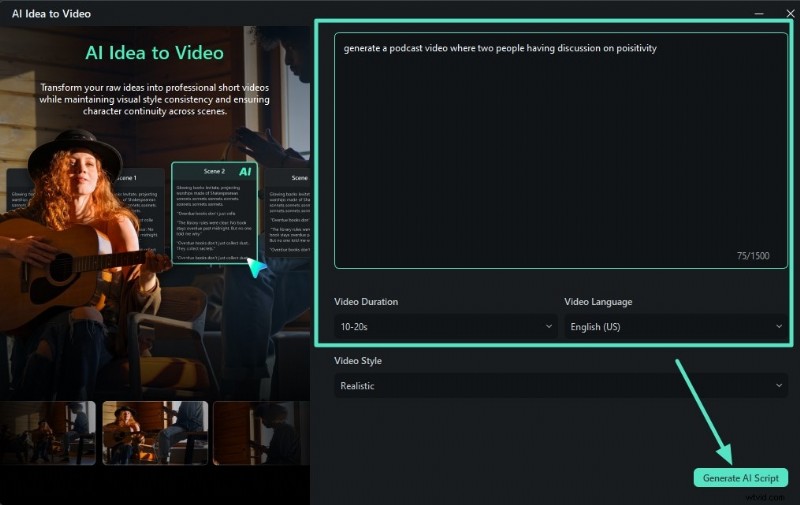
Generate Podcast Script
- In the following interface, import the idea for your podcast in text form and select the duration.
- Next, choose the language for your content and press "Generate AI Script."
Step 3
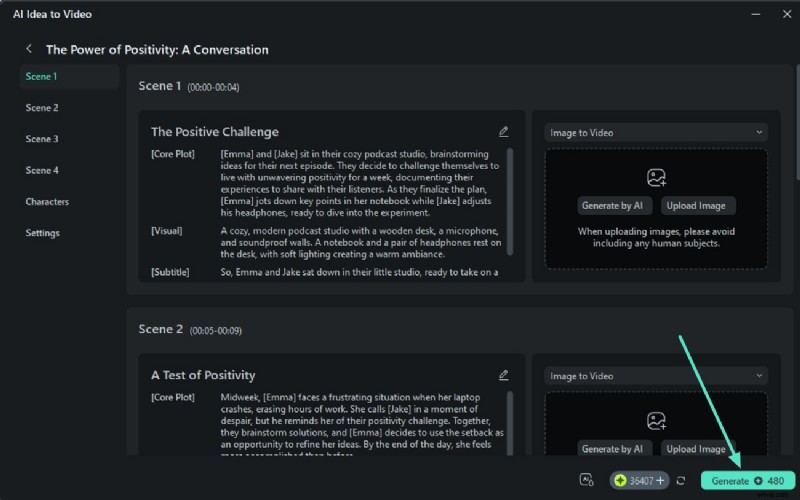
Review Script and Generate Video
- Once the script is generated, review the generated script and make changes to it.
- When you are satisfied with the results, press the "Generate" button to craft a video.
Step 4
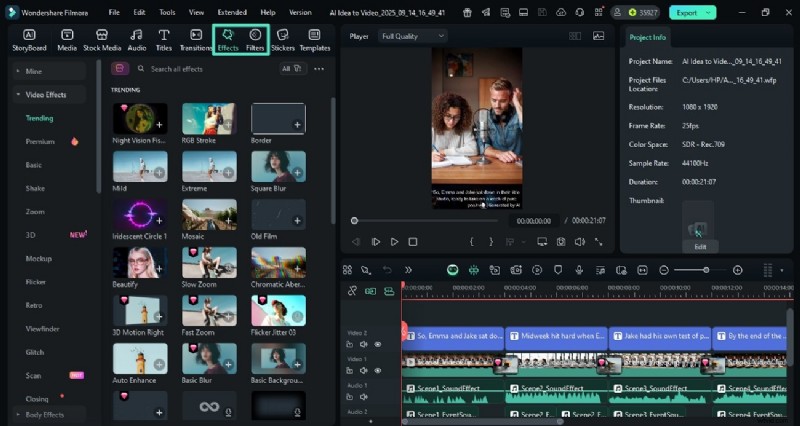
Apply Visual Enhancements
- After the video is generated, you can apply various enhancements such as "Effects" and "Filters."
- Simply access them from the top toolbar and apply them to the video with the "+" icon.
- You can then save the video by navigating through the easy-to-use panel of Filmora.
Pain Point #3: No Audio Library or Music Generation
Audacity podcast editing tool does not offer a music library for users to add as background. Moreover, it does not let users generate music.
Remedy #3: Use Filmora's Music Feature
- Filmora offers an extensive, royalty-free music library that can be added as background music.
- The tool also lets you generate music using text prompts and by specifying your requirements.
- You can then apply basic and advanced AI enhancements to the music.
Steps for Adding Background Music
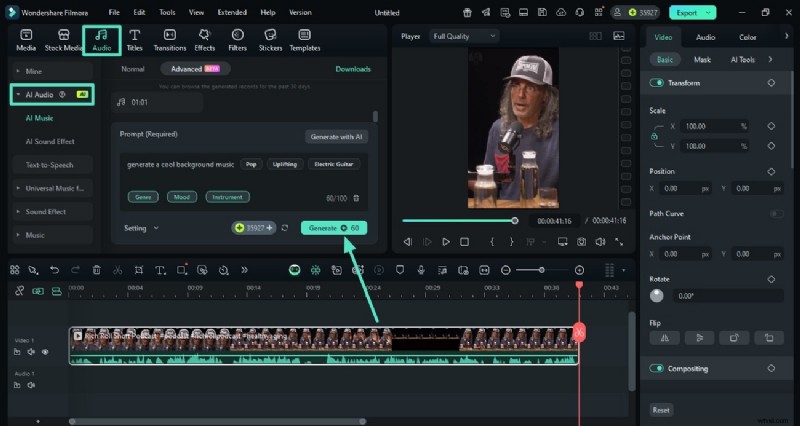
- Head for the "Audio" tab and expand the "AI Audio" section from the left.
- Now specify your requirements such as "Mood," "Genre," and "Instrument."
- Input the text requirement and hit "Generate" to execute the process.
Step 2
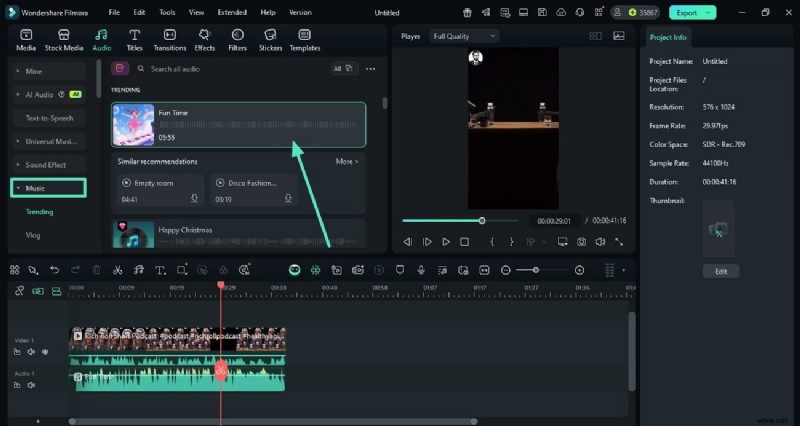
Consider Music Library as Alternative
- Alternatively, you can expand the "Music" section from the left to enable the library.
- Choose your favorite one and apply it to the media by pressing the "+" icon.
Pain Point #4: No Built-in Content Distribution
Audacity podcast software does not provide the utility of sharing the recorded and edited audio to social platforms directly from its interface.
Remedy #4: Filmora Offers Content Sharing
- With Filmora, you get the ability to share the generated content to different platforms right from its interface.
- You can directly upload the generated podcast to YouTube, TikTok, and Vimeo with only a few clicks.
- Users get the ability to add a Title, description, and Tags using Filmora's interface.
- It also allows you to generate a thumbnail using AI for your podcast effortlessly.
Comprehensive Steps to Distribute Generated Media Using Filmora
Step 1
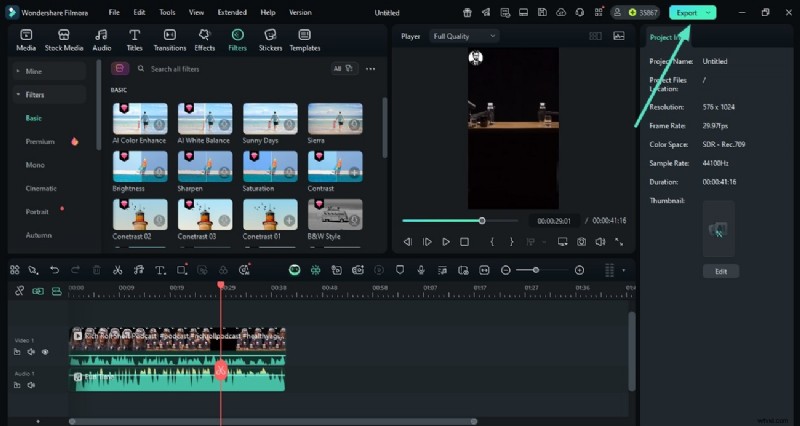
Choose Export After Generation
- Once you have completed your content generation with Filmora, press "Export" from the top-right corner.
Step 2
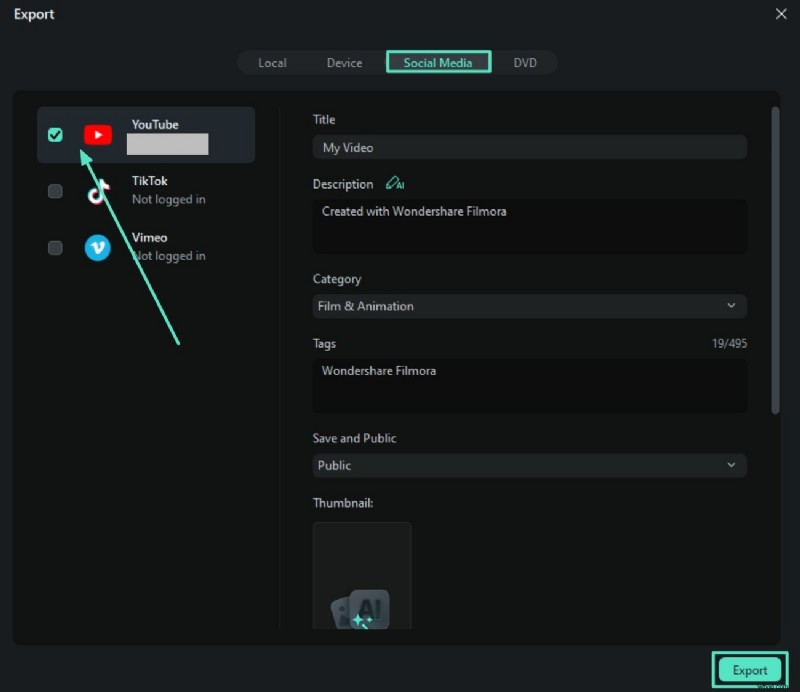
Enable Social Media Section
- In the following export window, enable the "Social Media" section at the top.
- Choose your platform and add details like "Title," "Description," and generate a thumbnail using AI.
- Once all the configuration is completed, head to the bottom and press the "Export" button.

Filmora
AI Video Editing App & Software
Best tool for making videos anywhere for all creators!
Your Perfect First Video Edit Starts Here - No Experience Needed
Conclusion
To wrap it up, this article discussed a complete review of how to use Audacity for podcasting. However, if you are looking for a more comprehensive solution to generate audio and visual content, use Wondershare Filmora. The tool offers numerous basic and AI-powered video and audio enhancement options with an easy-to-use interface.