Having a hard time understanding the exposure triangle? Keep getting over- or underexposed images? Use this reference guide for a perfectly exposed image.
Whether you’re just new to videography or new to cameras all together, getting used to the exposure settings can be tricky. If you change one, it’s going to affect the others. They all work together, so you have to know how they work together to get correct exposure in your videos.
You may be familiar with the three pillars of the exposure triangle already: ISO, shutter speed, and aperture. In this reference guide, we’re going to dive into all three to help you understand how they affect your shot. After that, we’ll go over how you can apply your newfound knowledge in the field. Let’s get started!
FREE Camera Bag Tag with Exposure Triangle Cheat Sheet
For a quick reference sheet on the go, we’ve designed a unique tag for your camera bag. It’s got the exposure triangle, along with some helpful tips to remember while you’re in the field. Just print it, cut it out, then laminate or tape up the tag to seal it! Download the PDF below.
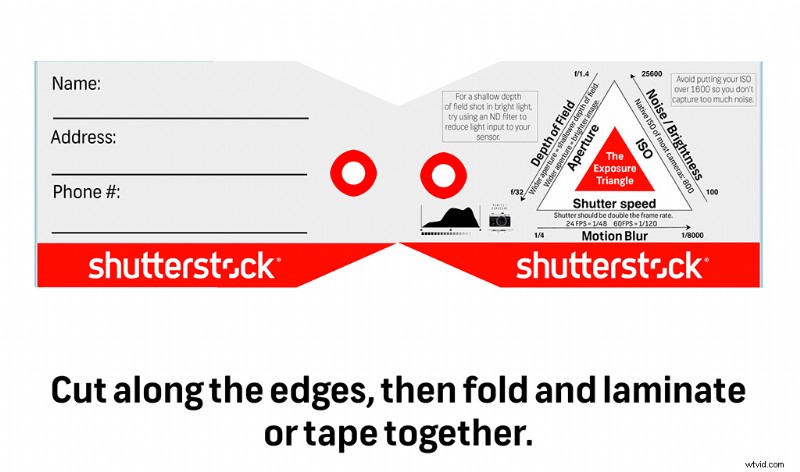
Download Bag Tag Here
Aperture
The aperture of your camera (otherwise known as the iris) is the small, adjustable hole that determines how much light passes through the lens onto the sensor. It’s the first point of contact between light and your camera. We measure the size of this hole in F-stops — usually from f/2.8-f/22. When adjusting for lighting conditions, aperture is probably the first thing you adjust, since most of the time its adjustment ring is right on the lens.
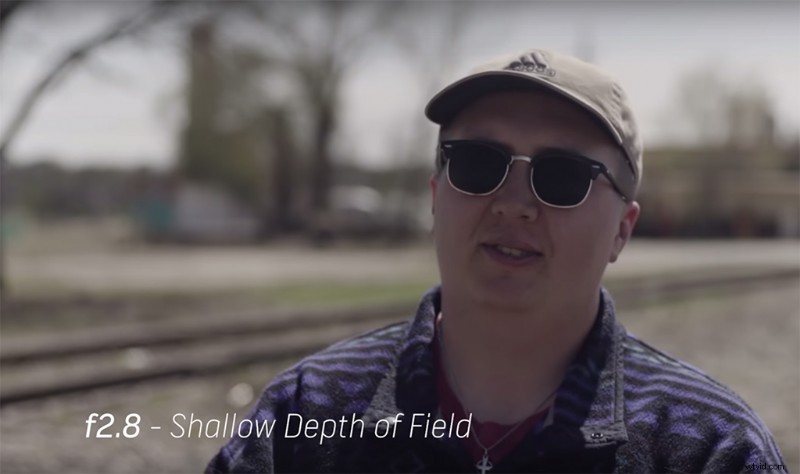
But, like the other exposure factors, changing the aperture has side effects. With a wide-open aperture, you’ll have a shallow depth of field, which will put your subject in focus and make the background blurry. With a closed aperture, you’ll have a deep depth of field, which puts just about everything in focus. So, here’s where beginner filmmakers have trouble. When they go shoot something outside, they will naturally close the aperture to adjust for the bright lighting, but then wonder why they can’t get a “cinematic” shot (shallow depth of field).
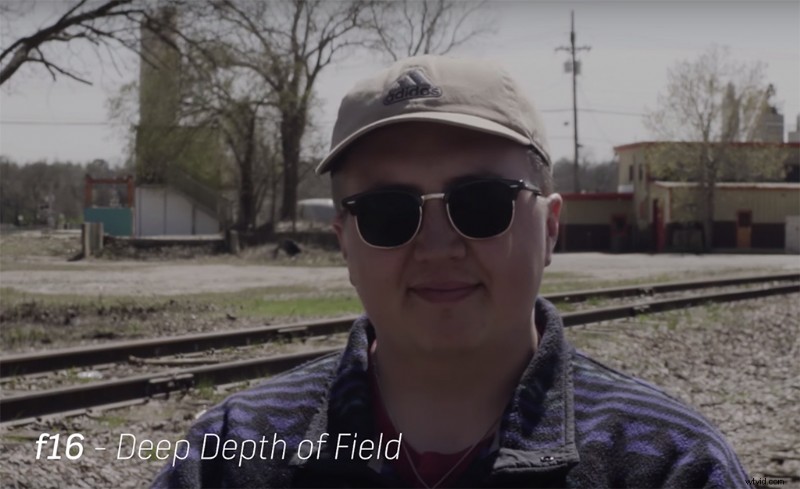
It’s because whenever you want a shallow depth of field, that aperture (for the most part) has to be open pretty wide. But for other types of videography, such as a news package, you might want a deeper depth of field to capture detail in the background. This is where you can close up the aperture, which, in turn, will allow less light through.
Shutter Speed
Shutter speed is how long your camera’s shutter stays open to allow light in for each frame. It’s light’s second point of contact on most cameras. We measure this in fractions like 1/50, or in angles, such as 180°.
For photography, choosing a shutter speed determines how long your shutter opens to capture a single image, and its rules are simple: small shutter speed means more motion blur; bigger shutter speed means less motion blur. Long-exposure photos require a slower shutter speed, and high-action photography, like sports, demands a faster shutter.
For videography, however, the rules are a little different. You almost never want to use your shutter speed to adjust for lighting. The common rule in film and video is to set your shutter speed to double your frame rate — 24FPS would have 1/48 shutter speed, and a slow-motion, high-frame rate video at 60FPS would shoot at 1/120 shutter speed.
This speed-of-shutter rule will yield the most cinematic motion blur. The higher you go, the more jumpy and aggressive your video looks. One of the exceptions to changing your shutter speed is when you’re shooting an action sequence. A high shutter speed can capture lots of motion without blurring any of the sequence. But you should almost never shoot at lower than double shutter speed — it just won’t look good.
ISO
The third and final stop on light’s journey onto your camera’s sensor is the ISO. ISO isn’t an analog mechanism like the aperture or shutter speed. It’s a digital signal booster that can either increase or decrease your camera’s sensitivity to light. A higher ISO will boost the sensitivity to light, and a lower one will reduce it. Now, ISO’s Achilles’ heel is the noise it introduces. If you aren’t familiar with noise, it’s the flashing artifacts on your shot you get when you shoot in really low light at a high ISO. To avoid getting noise in your shot, try finding your camera’s native ISO. This is the ISO setting at which your camera is most suited to shooting, and it will yield the clearest image possible. Most DSLRs’ native ISO is around 800-1600. Feel free to bump up and down from that native number a little bit, but usually, anything over 3200-6400 ISO is going to give you a bit of noise.
Application in the Field
So, you’ve familiarized yourself with the exposure triangle. Great! But knowing theory is much different than practical use. The exposure triangle is something you should know so well that it’s second nature to you out in the field. Personally, I use a hierarchy of accessibility when it comes to adjusting for light. It goes, in order:
Aperture > ND Filter > ISO > Lighting > Shutter Speed
I will always adjust my aperture first. If I want a wide-open shutter, but it’s too bright outside, I’ll try using an ND filter (which is basically sunglasses for your camera) to reduce light acceptance without sacrificing a shallow depth of field. From there, I’ll adjust my ISO for a well-exposed image. If I can help it, I’ll stick with the camera’s native ISO for the clearest image. If I’m still having trouble capturing a good image, I’ll try to adjust my lighting conditions — either dimming or increasing the lights on set or creating shadows with scrims or screens. And finally, if you’ve progressed all the way to adjusting your shutter speed, try a different shot. If the shutter is your only remaining adjustment, you may just need to change up your shoot.
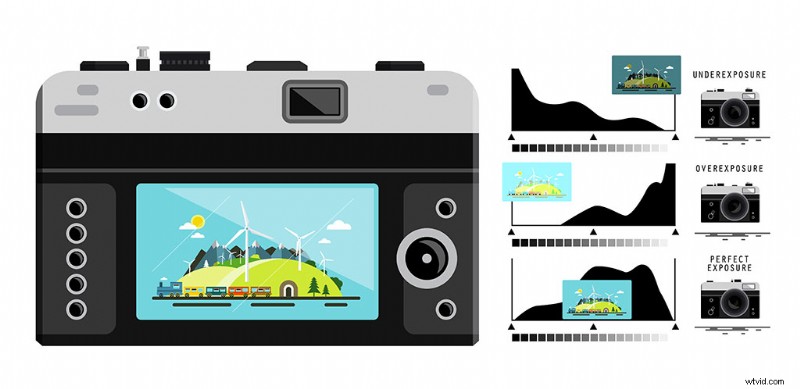
The best way to tell if you have a well-exposed image is your camera’s histogram. It’s a small meter that will display your highlights and shadows in a detailed waveform. You want your waves right in the middle — any cuddling up to either side means that you’re losing information to either the brightness or the darkness. This should be what you’re looking at when finding exposure, not the preview window.
Looking for more video production tutorials? Check these out.
- Tips for Reducing Visible Video Compression in Video Uploads
- How to Light Exterior Night Shots with One Light
- How to Shoot a Documentary in a Remote Location
- 7 Ways to Enhance Drone Shots in Post
- How to Create Dramatic Portraits with Shadow Photography