This post is all about the transitions used most often in editing.
Here’s a pretty basic tip, but good to remember: Fades to and from black start new scenes and cross dissolves typically indicate time passing.
In the video and transcription below, we’re going to show you the main reasons why and where you should be using each. Take a look!
Let’s start with fades to and from black.
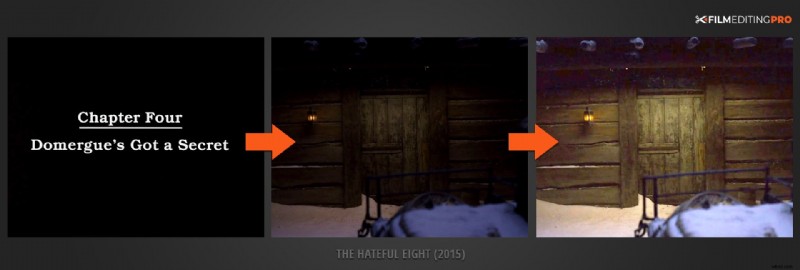
1. First, fades to and from black can signal the end of one theme or act and the beginning of another.
This cinematic device is a callback to its theatrical counterpart, the curtain opening or closing at act breaks, with the house lights following suit. It’s a great visual indicator to let the audience know you’re shifting the focus of the narrative. In this example from The Hateful Eight (2015), each chapter opens with a dissolve into the new scene.
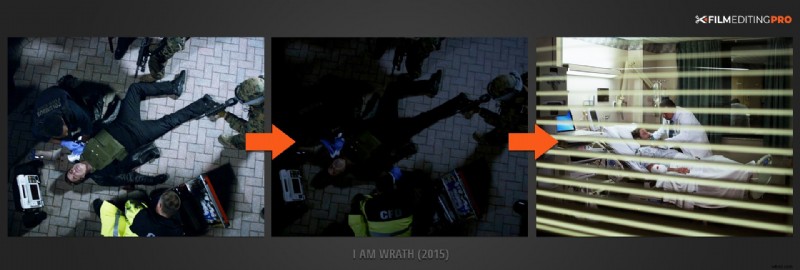
2. Second, fades to and from black can signal a significant jump forward, or backwards, in time.
They’re very effective at adding temporal space in your narrative flow. In the example below from I Am Wrath (2015) we see Stanley (John Travolta) receiving medical attention in one scene as it fades to black and brings up the next scene where he is recovering in a hospital room.
Clearly a long amount of time has passed between the two events. In the real world, we are missing his journey to the hospital, subsequent treatment and length of recovery.
3. Finally, fades to and from black can remove the need for editorial continuity.
This is why you’ll see them used often in trailers. Rapid changes in locale and action can be accomplished without jump cuts that might disorient an audience. In this example from a Warcraft (2016) trailer, we can clearly see how this is used to bridge some of the most sweeping and impactful shots from the film.

Ok, let’s move on to dissolves.
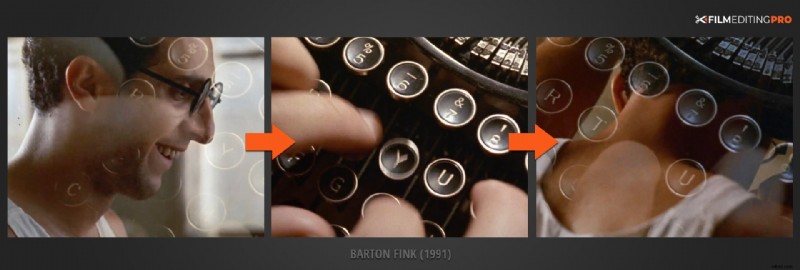
1. First, dissolves can signal moderate jumps ahead, or back, in time.
They signal a passage in time, though generally not one as substantial as a fade. Dissolves enables actions to be easily condensed. In this scene from Barton Fink (1991), dissolves are used to speed up the passage of time and display a range of emotion while he is writing his script.
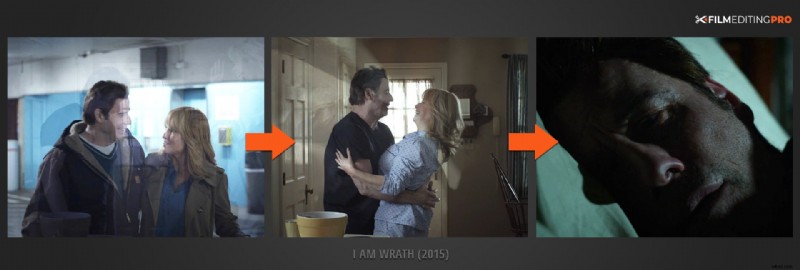
2. Additionally, dissolves can be used to indicate a character’s thought state.
Memories, dreams, reveries…all can be depicted more elegantly via a dissolve’s fluid texture. In this second example from a dream sequence in I Am Wrath (2015), we watch as multiple scenes of happier times dissolve between each other before finally landing on the image of a sleeping Stanley.
3. Finally, dissolves can be used to establish a strong visual connection between outgoing and incoming images.
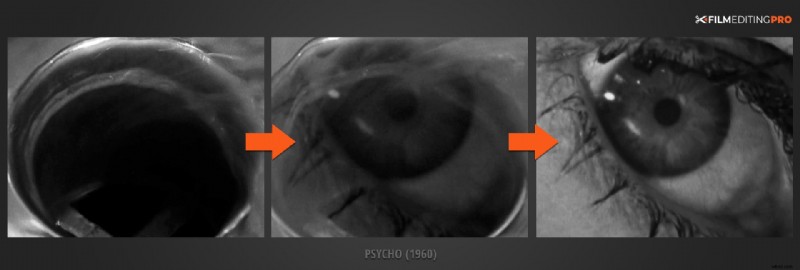
Whether it be though thematic or graphic means, two images occupying the screen simultaneously present an opportunity to have the audience make connections they might not normally make. We all know the famous shower scene from Psycho (1960). In this great example, we can see the connection of blood swirling down the drain into Janet Leigh’s lifeless eye.
How long should these transitions be?
An editor’s creativity comes into play when deciding the duration of both fades to black and dissolves. Let the mood and tone of the film at that moment dictate the degree of emphasis you wish to give to the transition.
On a technical note, keep in mind that dissolves need edit handles. Edit handles are extra frames of media that exist before and after the visible portion of a clip.
If you don’t have them, you’ll get an error message…“UNDESIRABLE dissolve elements”…and even if you do have them, ensure that undesirable elements like camera slates and extraneous camera movement don’t appear in your final dissolve.
Like this post? Let us know! Leave a comment below and be sure to mention anything else editing related you’d like to learn about.