Are you looking forward to animating a property? For animating, you change the value over time. In Premiere Pro, you can assign keyframes to the effect properties in order to animate it. Keyframes are thus, a useful element in Premiere Pro.
The keyframe in animation use was first popularized by Disney. In this article, you will learn how to add, delete, and use keyframes in Premiere Pro.
You may also like: Best Tutorial On After Effects Keyframes (In-Depth)
- Part 1: What Are Keyframes Used For
- Part 2: How to Add Keyframes in Premiere Pro
- Part 3: How to Remove Keyframes in Premiere Pro
- Part 4: How to Change Keyframes Values
Bonus Tip-Create Your Own Keyframes with Wondershare FilmoraPro
The keyframing features in FilmoraPro can be customized and adjusted to your liking. You can rotate or pan the video to give your video a cinematic effect. Moreover, you can combine all the effects to create your very own animations. Copy-pasting keyframes are also now available. Isn't that just wonderful? Trust me; keyframing has never felt easier. Download FilmoraPro and unleash your creativity.
You can also take basic editing to an advanced level with Wondershare Filmora (The latest version X). Its easy-to-use interface makes keyframing look like a cakewalk. You don't have to be a professional editor to use this.
Part 1: What Are Keyframes Used For
There are some people who asked the same question in forum. Keyframes Premiere are used in media production. It is a timeline location where the transition begins and ends. The keyframes have special information on where a transition should begin and end. The delusion of motion is created by the frames inserted in the middle of the start and end of the transition. While animating in the computer, such as the non-linear editing of video or 3D animation, the CPU mathematically performs the interpolation.
Learn more information about keyframes >>
Part 2: How to Add Keyframes in Premiere Pro
For adding keyframes in Premiere Pro –
1. Import video to Premiere Pro
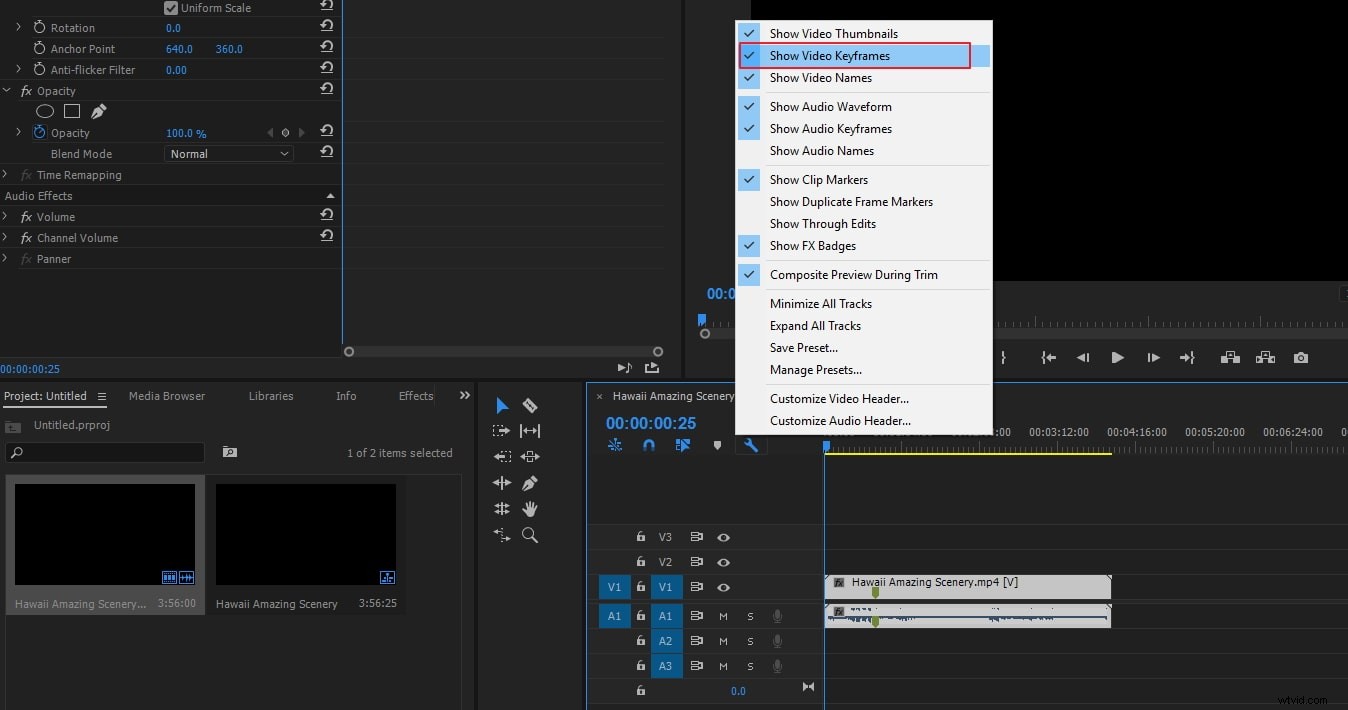
Open Premiere Pro and build a new project. Click Import to add the video that you want to animate. Now, drag it to the timeline. If you want to use the timeline function, you need to make it visible first if it is not visible by default. Click timeline display settings (wrench icon) and select show video keyframes.
2. Start adding keyframes
To activate the keyframing process, use the Toggle Animation button in the Effect Controls panel. Select the video clip on the timeline that has the effect you wish to animate. You must enable both audio and the video track to ensure that the keyframe is visible. For expanding the effect that you wish to add to the keyframes to, you must first click on the triangle in the Effect Controls panel, and secondly, for activating keyframes for effect property click on the Toggle Animation icon (this step can be skipped, if keyframes are being added to Fixed Effect).
Display the effect property’s graph either from the “Effect Control Panel” by clicking on the triangle for expanding effect property, its velocity and value graphs, and display or from the “Timeline Panel” by choosing the effect property from the effect menu just beside the track or the clip name. At the point in time, move the play head where you wish to add a keyframe.

3. Keyframe property
Next either in the Effect control panel, you may click the Add/Remove Keyframe button and adjust the value of the effect property. Or you may also Ctrl-click if you are a Windows user and Command-click if you are a Mac OS user, a keyframe graph using the pen tool or selection for adjusting the value of the effect property. The keyframe can be added at any position in the graph. You may or may not position the indicator for the current time. For effect’s property, you may adjust the controls (Effect Controls panel only) to create the current time keyframe automatically.
Note: - When you use a pen tool for adding keyframes, a modifier key is not required but while using a selection tool, the modifier is needed. You may use the above four steps as per your requirement for adjusting the effect property and for adding keyframes.
In order to navigate to other existing keyframes for making further adjustments, you can use the keyframe navigator arrow in the Effect Controls panel which is a great technique for keyframes set up for other effects.
Part 3: How to Remove Keyframes in Premiere Pro
Do you no longer need a keyframe? From effect property, you may delete the keyframe in either Timeline or Effect Controls panel. All the keyframes can be easily removed at one go. You may also deactivate the effect property’s keyframe. By deactivating keyframes with the Toggle Animation button in the Effect Controls, the existing keyframes are deleted. You cannot even create new keyframes until and unless keyframes are reactivated.
Whether the Effect Control Panel or Timeline Panel, ensure the effect property’s graphs are visible in it.
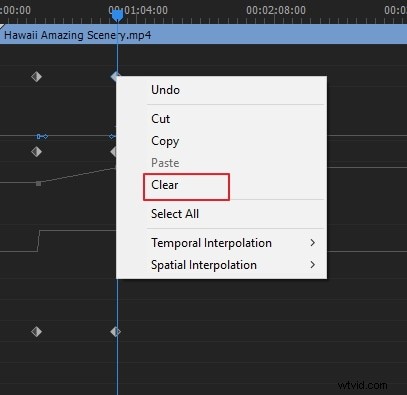
1. Clear option: You may either choose one keyframe or more than one and select Edit and then Clear or directly press the Delete option
2. Click Add/remove keyframes button: The current indicator must be navigated to the keyframe and then, Add/Remove Keyframe button must be clicked
3. Delete all keyframes: For the effect property when you want to delete all keyframes (Effect Controls panel only), on the left of the property or effect’s name, click the Toggle Animation button. You will be prompted to confirm your decision, you must click OK
Note:
You may restore keyframes if you accidentally delete it by choosing edit and then, undo. The deleted keyframes cannot be restored by toggle animation button reactivation.
Part 4: How to Change Keyframes Values
1. In order to change the value in the Effect Control Panel
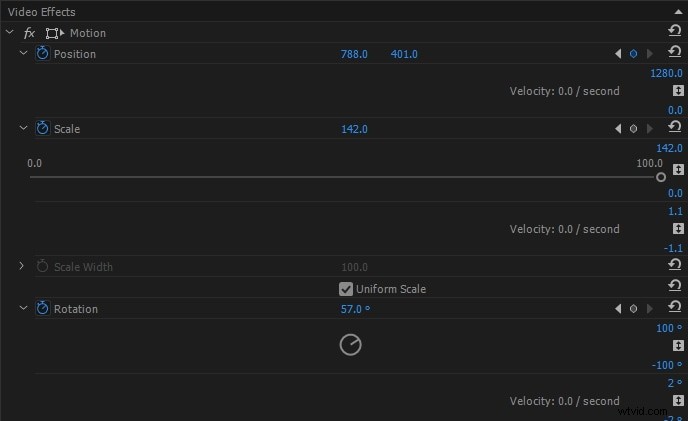
To expand the controls for the effect, click the triangle. For displaying keyframes value and velocity graph, click the triangle next to a property’s name. The pen tool or selection must be used on the value graph for dragging the keyframe up or down and changing the value of the effect property.
2. In order to change the value in the Timeline Panel
Select the keyframes and set the pen tool or selection over the keyframe or segment. The pen tool or selection is directed towards the keyframe or keyframe segment pointer. The keyframe or segment can be dragged up and down in order to change the value. When you drag it, the tip of the tool indicates the current value. The value of the clip or track is automatically adjusted when you drag it and no Keyframes are selected.
Conclusion
You may check the above instruction to easily change values or add and remove keyframes in Premiere Pro. It will ease your worries as there are no complex steps involved. Give it a try and you will surely be glad.