The LUT Browser in Blackmagic Design’s new DaVinci Resolve 15 can seriously streamline your workflow. Here’s everything you need to know.
One of the best features of DaVinci Resolve 15 is the new LUT Browser, which offers a real-time way to preview your LUT collection on the image you’re currently grading. In this post, I’ll walk you through everything you need to know to make the most of this great new tool.
Importing and Organizing LUTs in Resolve
First of all, it’s worth noting that DaVinci Resolve ships with several LUTs included, but there are plenty of places to find free LUTs online if you happen to be lacking in them. For starters, here are 29 free LUTs you can download from Premiumbeat.com and 35 free LUTs you can download from Rocketstock.com.
Importing and organizing your LUT collection is something you do outside of Resolve, at an operating system-level, but is very easy. You can open the LUT folder in your OS that Resolve references by doing the following;
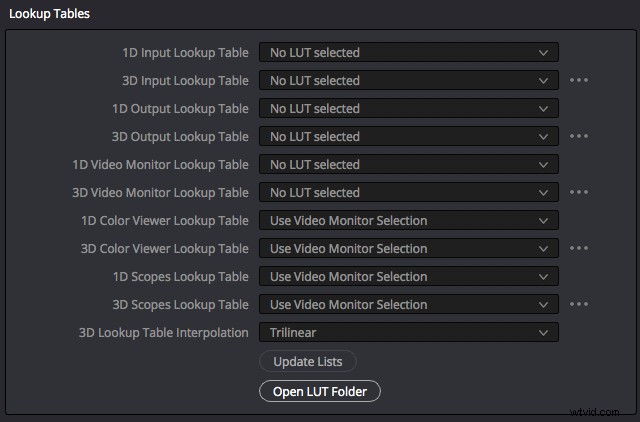
- Open the “Resolve Project Settings” window (the little cog in the bottom right-hand corner)
- Open the “Color Management” tab
- Under “Lookup Tables,” click on “Open LUT Folder”
(Or, on a Mac, go to Mac HD > Library > Application Support > Blackmagic Design > DaVinci Resolve > LUT >)
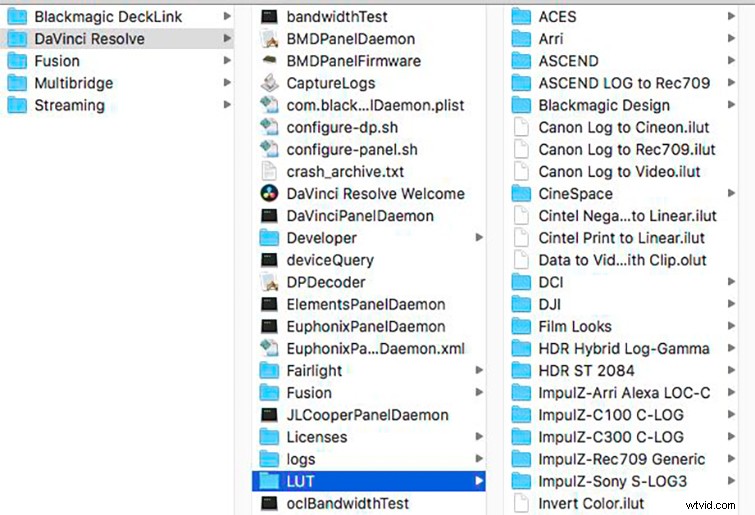
Here, you can group LUTs into folders, create subfolders, drag and drop LUTs, rename the files, etc. Order and name your LUTs in a way that helps you work efficiently. Then, once you’ve rearranged your LUTs and want to see those changes in DaVinci Resolve, simply right-click in the sidebar of the LUT browser (or within a space in the LUT preview area) and choose “Refresh.”
How to Favorite LUTs in DaVinci Resolve 15
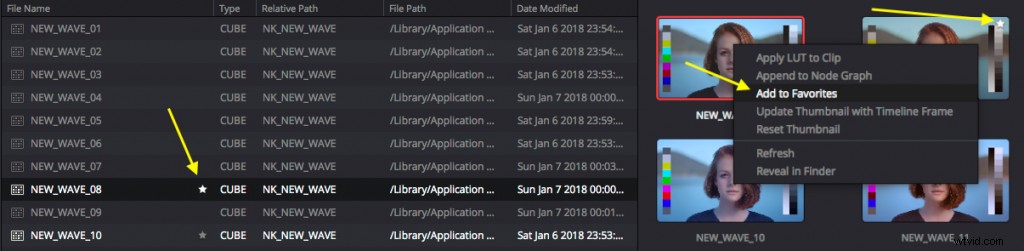
The only way to actually organize your LUTs inside DaVinci Resolve is to use the Favorite tool, which you can do three different ways:
- In “List,” click on the Favorite star next to the filename.
- In thumbnail view, right-click on a LUT and choose “Add to Favorites.”
- In thumbnail view, click the star icon that appears when you hover over the top right corner.
You can see a list of all your favorite LUTs in the Favorite folder at the bottom of the LUT browser sidebar. To remove a LUT from the Favorites section, use any of these three methods in the inverse. (This is a really handy way to build a mini-collection of your essential LUTs in just a few clicks.)
Previewing LUTs in DaVinci Resolve 15
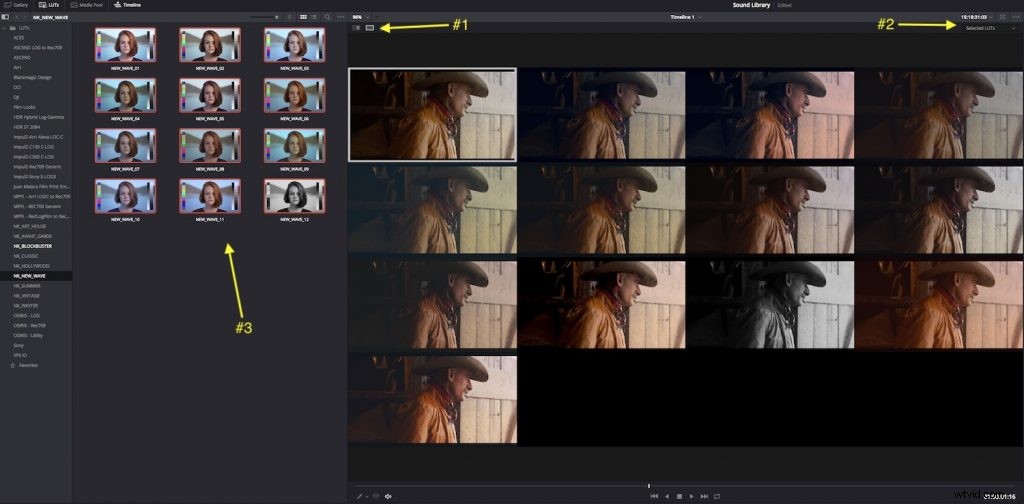
You can preview the effect of any given LUT in a number of different ways. Possibly the best way to find the exact look you want when comparing LUTs is to use the split-screen comparison grid view, as you can see in the image above.
You can do this with three clicks and a drag:
- Click on the “Split-Screen Mode” button in the viewer.
- From the dropdown menu, choose “Selected LUTs.”
- Click and drag a selection of the LUTs you want to preview.
The image in the white box is the original image. If you make any adjustments to your image in this view, you will see the changes in every image in the grid. You can preview up to 16 different LUTs this way — or create a before and after, side-by-side comparison by selecting just one LUT at a time.
By hovering over any LUT thumbnail, you’ll see a small, real-time preview of how the LUT will look over the duration of the clip. You can adjust the size of the thumbnails with the slider at the top of the browser window, but they don’t get very big. (This is why the split-screen comparison is so useful.)
You can also change the image in the LUT thumbnail from the default image to any image of your choice. Just right-click on the LUT and choose “Update Thumbnail with Timeline Frame,” and it will save the current frame under the timeline playhead to that LUT preview. (You can undo this by right-clicking and selecting “Reset Thumbnail.”)
Adding LUTs in Resolve

Adding a LUT to your current node is easy: just double-click on it. You’ll then see the little LUT grid icon in the bottom section of the node to indicate that it has been applied.
When clicking around to find the right look from your LUT collection, make sure you don’t accidentally apply a LUT to your node because then you’ll be previewing your LUTs on top of that LUT.
You can also right-click on the LUT thumbnail and choose “Apply LUT to Clip” or “Append to Node Graph” if you want to add a serial node to your grade with the applied LUT.
To remove a LUT from a node, right-click on the node and choose “No LUT” from the LUT sub-menu.
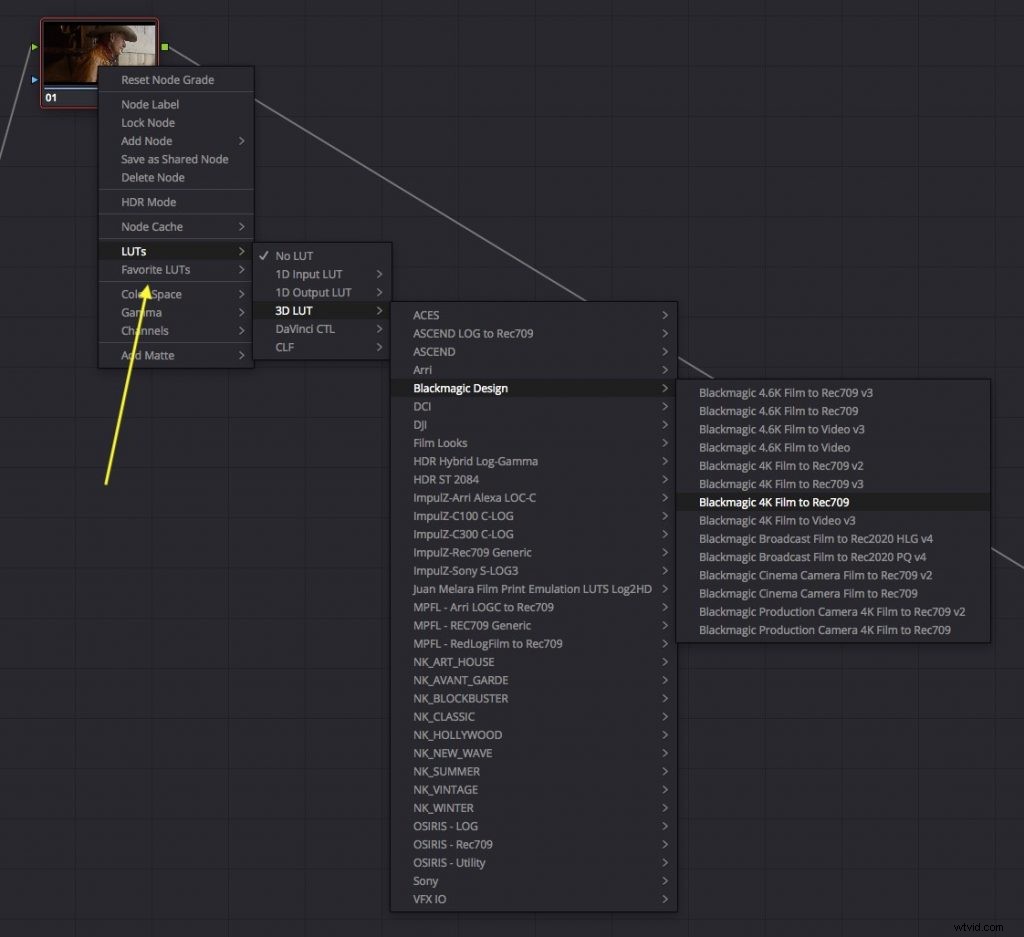
You can still apply a LUT to a node in the traditional way, by right-clicking and navigating through the sub-menus, but it’s a much more cumbersome approach than the visual LUT browser.