
Lighting is the cornerstone of any compelling photograph. Even with flawless settings, exposure, and composition, a flat image will still fall short if the light is poorly managed. In this fourth installment of our Finding the Light series, we tackle one of the most challenging scenarios: shooting in harsh, mid‑day sunlight. By understanding how to locate, control, and enhance this intense light, you can turn a potentially disastrous situation into a series of striking, balanced portraits.
For those new to the series, you can explore the full progression here:
- Part 1: Finding the Light
- Part 2: Using Shadows for Dramatic Portraits
- Part 3: Shooting the Golden Hour
- Part 4: How to Shoot in Harsh Light
- Part 5: 3 Ways to Use Window Light
- Part 6: Creative Light Sources

Recognizable cues of harsh lighting include squinting eyes, sharply defined shadows, and blown‑out highlights. While it can be intimidating, mastering this light is essential for photographers who need to work outside the golden hour or on location. Below are the key strategies that have helped me, and can help you, create flattering images under any conditions.
What Is Harsh Light?
Harsh lighting is bright, directional illumination typically found around midday. It produces strong, well‑defined shadows that can create dramatic contrast but also risk flattening facial features if not handled correctly.
Locate the Shadows
Begin by observing the shadows on the ground. Their direction reveals the sun’s position, allowing you to position your subject so the sun does not fall across their face. This simple step prevents unwanted squinting and uneven exposure.

Position the Sun Behind Your Subject
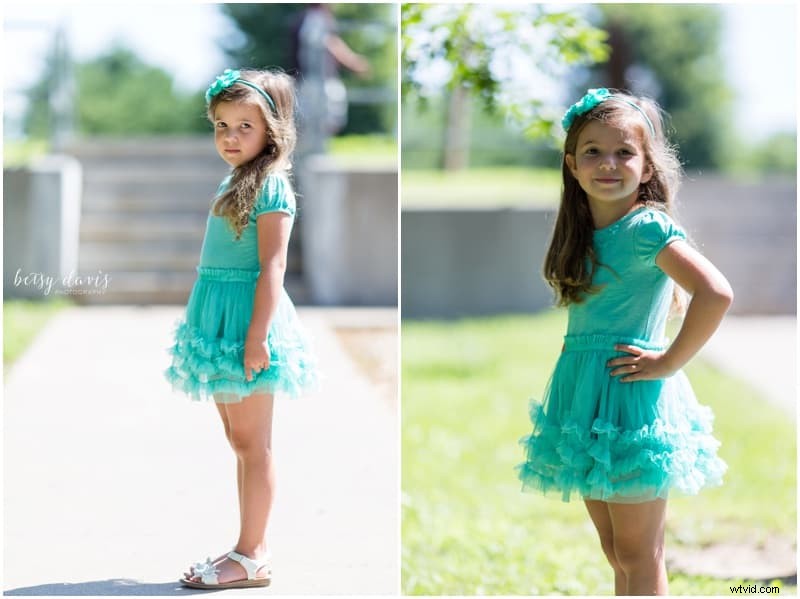
Once you know where the sun is, orient your subject with the sun at their back. This eliminates harsh facial shadows and introduces flattering rim light along the hairline. For example, a portrait taken at 11:30 a.m. on a clear summer day shows how positioning behind the sun preserves detail and tone.
Leverage Natural Reflectors
Neutral-colored surfaces—such as sidewalks, concrete, or white walls—can act as natural reflectors, bouncing light back onto the subject’s face. Compare the left and right images below: the sidewalk provides even, cool-toned fill, whereas grass fails to reflect light and even adds a green tint.
Block or Diffuse the Sun
When direct light is overwhelming, use nearby structures, trees, or shade to reduce intensity. Even a small shaded area can dramatically soften harsh highlights, as demonstrated in the photo taken at 10 a.m. on a clear morning.

Expose for Skin Tone
Employ spot metering focused on the subject’s face and expose for skin tone. This technique ensures accurate exposure and natural skin colors, even when the background is overexposed.
Tools to Enhance Harsh Light
Portable reflectors can be invaluable for bouncing light onto a subject, though they may require assistance. For fast-moving subjects—like children—consider a fill flash to counterbalance shadows. These tools, combined with the strategies above, provide a robust toolkit for any harsh light scenario.
Mastering harsh light expands your flexibility and confidence as a photographer, allowing you to capture compelling images at any time of day. For more insights, continue exploring our series:
- Part 1: Finding the Light
- Part 2: Using Shadows for Dramatic Portraits
- Part 3: Shooting the Golden Hour
- Part 4: How to Shoot in Harsh Light
- Part 5: 3 Ways to Use Window Light
- Part 6: Creative Light Sources
Stay tuned for upcoming additions to the Finding the Light series!