Alright. Color temperature.
I can already hear your question: What do these two unrelated words have to do with each other and why are they important?
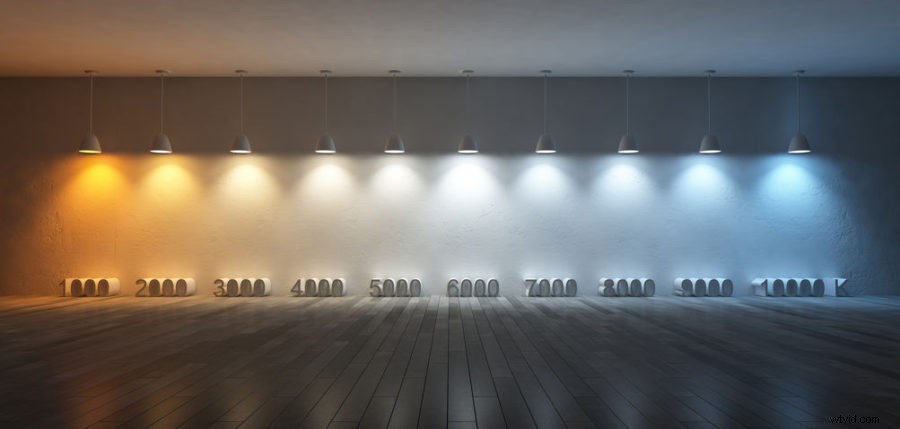
Put simply, color temperature is a measurement of the hue of the light sources influencing your shot. Color temperature is measured in degrees Kelvin. The lower the Kelvin setting in the camera, the bluer (or colder) your light sources appear, while the higher the Kelvin, the more orange (or hotter) they will seem. This is the first level of color correction before post-production is even reached, and it all falls under the umbrella of a process of color balancing your image called White Balancing.
Got all that? Now let’s make sense of it, starting with…
This is part two of a comprehensive look at the technical aspects of lighting for video production. While this article can be read on its own, I recommend starting here with part one, which deals with choosing the optimal wattage for lighting your video.
Color Temperature
You may be thinking that lights are lights, that they’re used for brightness and they’re all the same apart from that. Plot twist: you’d be wrong.
Different lights project a different hue of light. Why are streetlights so orange while hallway fluorescents in schools and office buildings so white? Why are some white Christmas lights yellow instead of actually white?
Because they have differences in what we call color temperature.
The temperature of color simply refers to the measurement of its hue. Different hues are considered to have different “temperatures”.
We use a numeric system of measurement to quantify color temperature called Degrees Kelvin. The range of Kelvins can go from anywhere in the low hundreds up to 10,000.
Very orange-projecting lights, such as incandescent bulbs or firelight, will have a lower Kelvin rating, somewhere in the 3000 range and below. More blue lights like daylight will have a higher Kevin range, 6000+. Anything in between, like fluorescents, will be more neutral, white light.
Every single lighting type has a unique color temperature, which brings me to…
Tungsten Lights
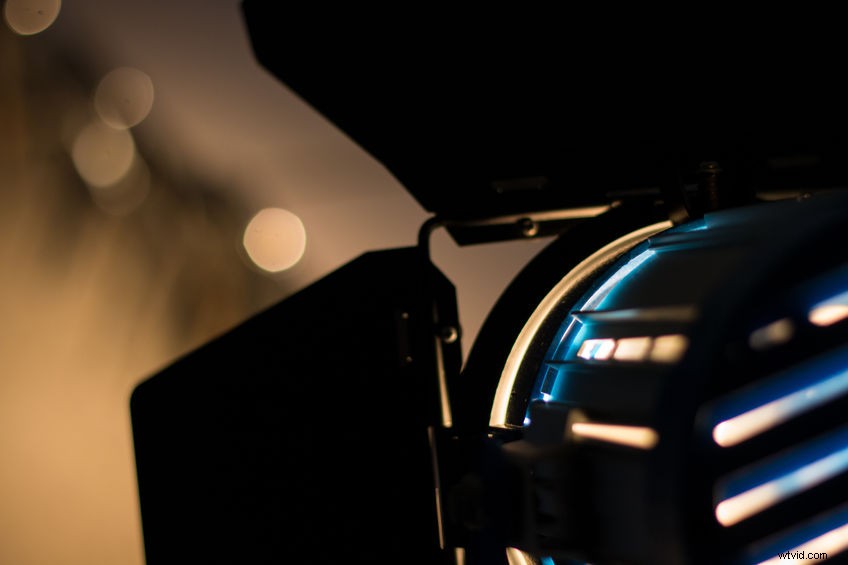
Let’s talk some about some lights you may be using on a film set or shoot:
The most basic lighting kits you can rent are usually going to be tungsten-based lights. These naturally run high-kelvin temperatures or a more yellow-orange glow. Your 250s, 500s, 1Ks, and 2Ks will all have that standard lightbulb yellow color associated with them.
So be aware, when using these cheap kits, of the color temperature you will be getting. If high Kelvin isn’t what you’re looking for, you have some other options, such as…
Fluorescent Lights and Softboxes
Often used for photography due to their neutral glow, softboxes and fluorescents generally give off a more clear white light, something in the middle Kelvin range, 4000-4500ish.
If you get yourself a few of these, you can mimic portrait light or in some cases, a very soft, foggy white light of a dull, cloud-covered day.
If you aren’t financially able to take advantage of different lighting kits and are instead stuck with the cheapest option (usually tungsten), then fear not, there is still another way to get the color temperature you seek:
Gels

Gels are simply transparent sheets of colored plastic that attach to the barn doors of lights and change the hue of the light coming through.
Gels are perfect changing the hue of lights, but they also have an added benefit to balancing the lights you already have. Let me explain.
Say you’re shooting a scene with both daylight and tungsten, or fluorescent and tungsten, or whatever combination of clashing light hues. Looking through the camera, your hues are going to look off, and nothing in the camera settings (which we will talk about later) will be able to make them match.
If we set the camera to balance for one light, it will make the other look even more extreme.
How do you get around this? You guessed it. Gels.
To avoid the problems of dual-color hues (unless you want them), you can slap a daylight blue gel on your tungsten light, effectively matching it to the sunlight in your shot. Then, set your camera accordingly, and voila, the lights all match and are balanced correctly.
Gels are very useful and often come preset with a Kelvin rating, so you know what the new temperature will be after attaching it to your light.
Gels also come in the entire color wheel of options besides blue and orange, giving you the ability to make some very Nicholas Winding Refn-esque neon shots. And best of all, gels are relatively inexpensive and reusable.
LEDs and Changing Hues
Thanks to advances in lighting technology, we don’t always have to use gels for altering the color temperature.
Many LED lights today come equipped with dials for brightness and color temperature. Simply crank the dials whichever way you need and adjust the Kelvin of your light.
This can save you time and let you match color temperature with any other non-LED lights you may have.
LEDs also don’t run hot, so they’re all-around safer than tungsten for setup and breakdown.
Color Temperature and Camera Settings
So, we understand color temperature and how it relates to lights, but how does all relate to the setting in your camera?
When you find the color temperature setting on your camera, you will see a number measuring the temperature your camera is currently set at.
This measurement reflects the degrees Kelvin (the measurement of the temperature of the hue) your camera is using to interpret the light in the shot.
A low-Kelvin setting, something in the 3000K ballpark or less, is going to give you more of an orange hue to the lighting in the image, while a higher Kelvin setting, something 6000K or higher, is going to give the image a blue hue.
Contrary to what you may be thinking, this setting is not a quick-fix tool for color-grading. You’re not designing the color palette of the image through color temperature settings, that is saved for the edit.
No, what color temperature adjustment is really for is to get an image looking as balanced (hue-wise) as possible. Which brings us to…
White Balance
When looking at the subject of your shoot, be it a person, a landscape, or an object, the colors might all line up from your perspective, yet look completely different in-camera.
Let me explain:
Say you’re shooting a dish soap commercial, and you’re emphasizing the cleanliness of the dishes that were just washed by your actor or actress. You want to slow-zoom on a pearly white set of plates. Voila, no grease, no oil, no stains. Fantastic.
But the image in your camera keeps coming out more brownish than you intended. The dishes aren’t sparkling white like they are to your eyes. Why is that?
Short answer: Your camera is not properly white-balanced, and the color temperature your camera is using isn’t lined up with the lights you’re using to illuminate your pristine plates.
Now, your brain is actually very good at filtering color hues affected by different temperatures of Kelvin.
We know that white is white, no matter if it’s illuminated by bright sunlight or evening streetlamps. But cameras are not as adept as us and will not interpret the base color correctly without the proper setting.
This is where the term ‘White Balance’ comes from, it is, quite literally, telling your camera what white (and, by extension, every other color) should look like in the image. In this way, white balancing the camera to offset any potential excess hue your lights may be giving off, you can filter those hues out, making white look white.
Is your image lit by hard blue LEDs? Crank up to 5000+ Kelvin and inject some orange into the image to balance it out. Is the image too orange under those nighttime streetlamps? Go the opposite way and push that Kelvin down to add some blue.
White balancing is the first form of color correction you will be doing in shooting your media.
Unlike color grading, which is purposely adjusting the colors of your image for stylistic reasons,
White balancing corrects color imbalance, making color grading from a neutral image much easier in post-production.
If you want to learn more about white balance and looks, have a look at our guide Look, LOG, LUT, White Balance, Picture Profile & RAW.
Let’s Talk Practicality
I mentioned that different types of lights have different color temperatures, which will force you to adjust your camera’s color temperature accordingly, but let’s talk through some general Kelvin settings for certain common lighting situations.
To white balance for direct sunlight, which is very blue, the common temperature setting for white balance is 5600K.
For incandescent or tungsten lights, which are very orange, set your temperature to 3200K.
For fluorescent bulbs, which are more middle of the road and white, a color temperature of 4000-4500K will work.
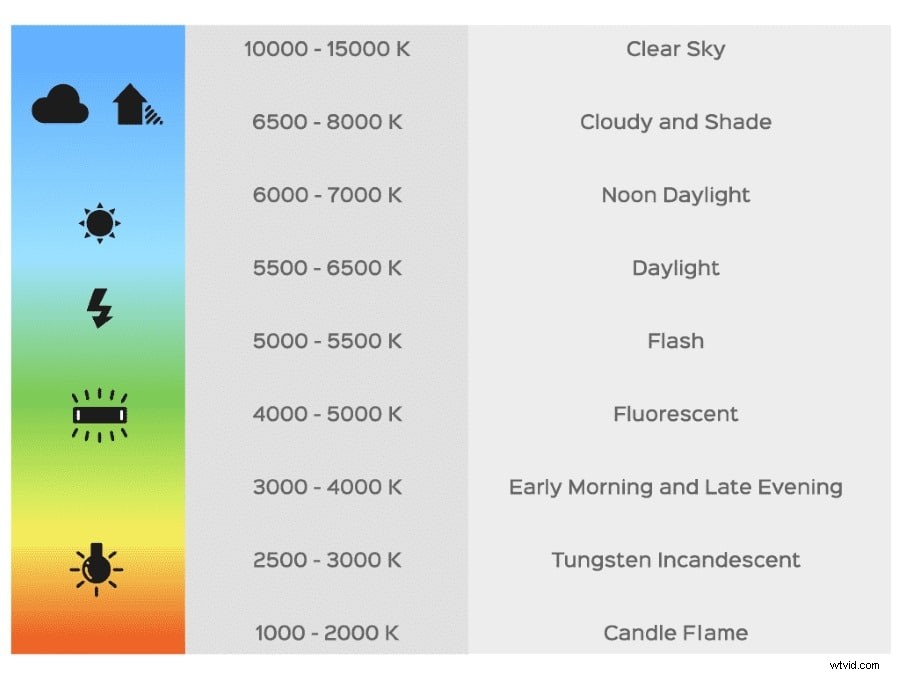
Setting your Kelvins in-camera to match the light’s temperature tells the camera what the light in the footage is missing.
So when your camera is interpreting 3200K light, which is very orange, it knows to add blue to the image (or pull orange out) to balance it and make white look white. The same goes for high-Kelvin blue light.
These are some typical situations you can commit to memory, but for everything else, there’s a useful tool called a…
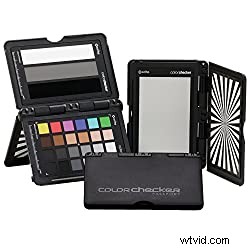
Gray Card
What is it? Well, just that, a gray card. But it’s much more useful than it seems.
Essentially, a gray card serves as a solid reference point for setting your camera’s white balance.
It’s a middle-hue gray, which is easy for most cameras to interpret and doesn’t change much under different light sources.
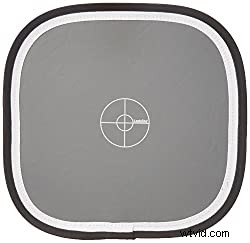
To set white balance, place the card right in front of your camera and adjust your color temperature and brightness accordingly. Make sure the card is catching the light in the same way as your subject, to mimic the lighting conditions as closely as possible to how they will fall on your subject.
Once the card is in place, tune your camera to custom white balance, adjust your color temperature to the best setting, and save the custom setting. Now you’ll have it for the rest of the scene, and if you move lights around or use the same lights in a different setup, the white balance will be saved for easy choosing.
Most cameras have an auto white balance option, but in filmmaking, control is paramount, even over the most minuscule details, so, while auto is probably decent, making custom settings for different light types is more beneficial to you in the long run since you’ll be learning to understand how light and color temperature work.
Using White Balance for Style
I mentioned above that white balance is color correction, not color grading, and it’s generally not adjusted for stylistic purposes (here comes the ‘but’), but art is nothing if not subjective, and if you’re looking for a more orange or blue hue in your image for aesthetic purposes, then go for it.
It is important to know the correct process of balancing and adjusting color temperature, however, because, while editing software today is powerful and multi-faceted if you can save yourself time in post-production by doing everything right in production, you should.
Balance Like a True Cinematographer
Now you should be more than capable of balancing your image and correctly setting the color temperature in your camera. And even if you want to keep that blue-toned or orange-hued image, at least now it will be your choice.
If you still have any other questions about white balance, color temperature, or Kelvin, feel free to drop a comment below. In the meantime, keep a look out for part three on our comprehensive lighting breakdown!