Sometimes it can feel like there’s some guesswork in getting the shot right. You change something, take another photo, look at the screen on the back of the camera for things to correct. And repeat.
The best way to save yourself some runaround (and many outtakes!) is by tethering. Lightroom allows you to tether directly to it so that it imports images as you shoot.
Like many of the best photography tricks, Lightroom tethering is easy once you know how! Get started with our step by step guide below.

What Is Tethering?
Tethering means connecting your camera to a computer, tablet or smartphone. Images appear on the screen as you shoot them.
You can do this wirelessly or with a basic USB cable. There are several apps and programs that allow for tethering.
Today we’ll be going over how to tether directly into Lightroom using a USB cable.
The main benefit of tethering is that you can review images as they’re taken. This can take some guesswork out of the photoshoot process. It can also make it easier to discuss the photos with clients as they’re taken.
Being able to review, analyze, and adjust a photo during a shoot can also result in fewer images to cull later. Fewer images to cull means a speedier workflow for you!
There aren’t many drawbacks to tethering. The main one to keep in mind is that it does make the photoshoot process slower.
By looking at each image as it appears on the screen, you take more time during the shoot to perfect each setup.
This should balance out later when you have fewer photos to review during your post-production work.
How to Use Lightroom Tethering
All you need for tethering to Lightroom are your camera, your computer, and a long USB cable.
A laptop works best for portability. You may consider getting a wheeled cart to rest your laptop as you shoot.
Now let’s dive into the steps to setting up tethering to Lightroom!
Step 1
Plug your camera into a computer using a long USB cable. This creates a direct line of communication between the camera and the computer.
You’ll want the cable to be at least 6 feet long. Keep in mind that you may need a longer length if you plan on moving more throughout the shoot.
Step 2
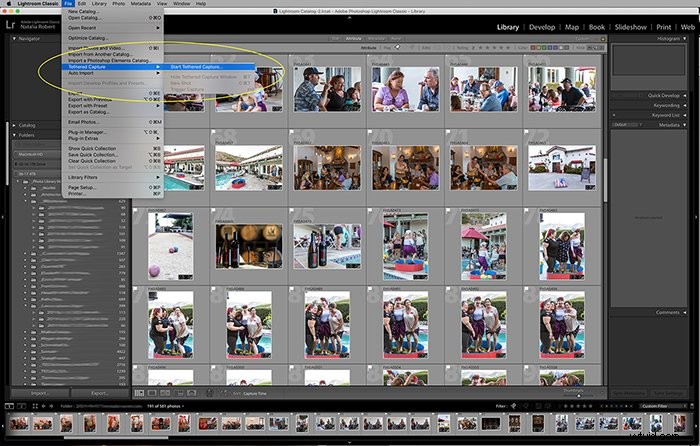
Go to File → Tethered Capture → Start Tethered Capture. This tells Lightroom that you want to start a tethered session.
Step 3
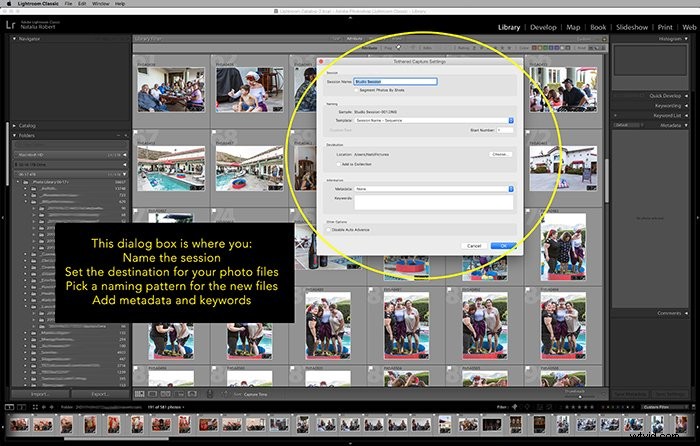
A dialogue pops up where you can set the Lightroom import settings for the entire session.
Here, you’ll be able to do a few things. You can name your session and choose a location for the imported files to save to. You can also set a naming pattern for new files, add metadata, and add keywords.
Make sure “Disable Auto Advance” is NOT selected. Auto-advance lets it show the most recent capture.
Step 4
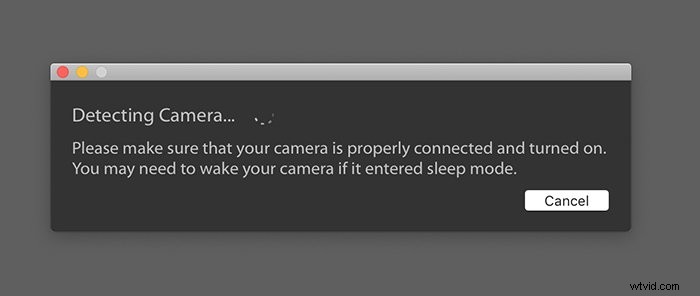
Click OK to start. This is where LR will detect your camera.
Step 5
Start shooting!
Things to Know
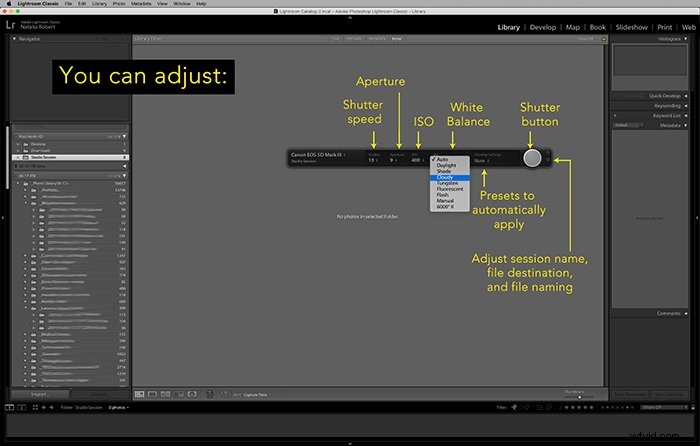
Lightroom tethering lets you control some camera settings as you shoot. It even lets you take a photo from within Lightroom! You can adjust the shutter speed, aperture, ISO, and white balance.
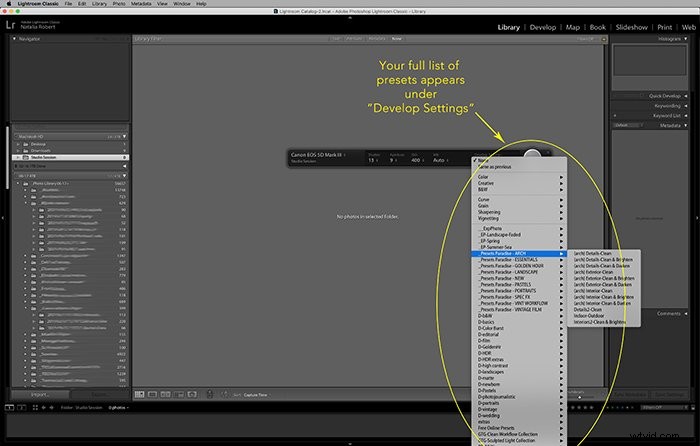
You can also select a preset from your existing library to apply to all photos as they’re imported.
If you’re having issues with Lightroom detecting your camera, there are things to try.
First, confirm here that your camera is compatible with Lightroom tethering. Not all brands and models are.
Also, your cable may not be working well, so try switching it with a newer one to see if that’s the issue.
Finally, check your camera’s firmware and the installed LR version. Make sure they are both updated to the latest versions available.
Conclusion
Whether you do product photography, portraiture, or architectural photography, tethering your camera can save you many headaches.
By viewing photos as they’re taken, you can make adjustments on the spot and involve your client in the process!
One of the easiest solutions, especially as you begin to explore tethering, is to tether directly to Lightroom. Following the steps above, you’ll easily be tethering your next photoshoot!