
While many photographers rely on the Basics panel sliders for exposure, the Tone Curve in Lightroom unlocks a deeper level of control over contrast, mood, and color. Mastering this tool can transform an ordinary image into a striking visual story.
What Is the Tone Curve?
The Tone Curve, often simply called “Curves,” is a powerful adjustment that tweaks the brightness values of shadows, mid‑tones, highlights, and the overall dynamic range. By manipulating the RGB curve or individual Red, Green, and Blue channels, you can shape contrast and color with surgical precision.
Tone Curve vs. Basic Sliders
Both tools influence image appearance, yet they operate on different data layers:
- Basic Sliders adjust the baseline exposure data. They are ideal for correcting under‑ or over‑exposure.
- Tone Curve works on the tonal information already present, allowing nuanced contrast adjustments without altering the underlying exposure.
Try each on the same image: you’ll notice the histogram shifts with the Basics sliders, while the Tone Curve keeps the histogram steady but changes the tonal mapping.
Key Features of the Tone Curve Panel
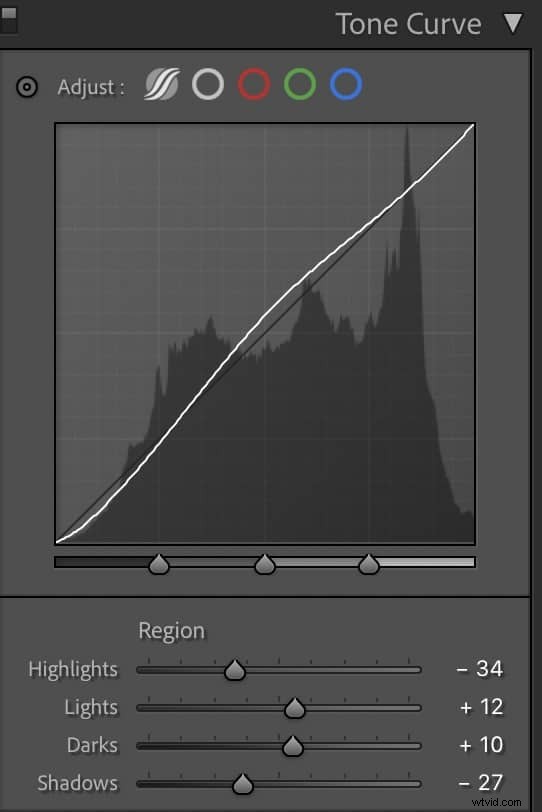
- Point Tool (triangles & circle icon) lets you click on a specific image region and adjust its tonal values directly.
- Channel Sliders below the graph control Highlights, Lights, Darks, and Shadows. Hovering over a slider highlights the corresponding curve segment.
- Edit Point Curve (upward‑curve icon) offers a quick way to drag the entire curve up or down.
- Point Curve Presets—Linear, Medium Contrast, Strong Contrast—provide starting points for common contrast profiles.
Practical Uses of the Tone Curve
RGB Channel Manipulation
In Point Tone Curve mode, the Channels selector allows you to tweak Red, Green, or Blue independently. This capability is essential for:
- Split toning or color grading
- Removing unwanted color casts
- Adding a creative colored wash
- Clipping colors for dramatic effect
To create a custom split tone, place anchor points around the desired range and adjust one channel while leaving the others untouched.
Adjustment Point Picker
The point picker, located at the top left of the module, lets you target a single pixel or area. Adjusting its value updates the corresponding point on the curve instantly, making rapid tweaks effortless.
Color Balancing with the Curve
After selecting a channel (e.g., Red), dragging the curve upward adds that color; dragging downward removes it. This method offers a more granular color balance than the basic White Balance sliders.
Fine‑Tuning After Presets
Presets often skew color channels. Inspect the red, green, or blue curves after applying a preset and flatten any S‑shapes to restore natural tone. Small anchor point adjustments can neutralize unwanted color dominance.
Building a Custom Tone Curve
Start with a Linear preset, then switch to Custom mode by placing the first anchor point. From there, you can:
- Drag points to shape shadows, mid‑tones, and highlights.
- Fine‑tune each RGB channel for targeted color grading.
- Save the curve as a new preset for consistent application across a series.
Why Choose Tone Curve Over Sliders?
While Basic sliders provide quick exposure fixes, the Tone Curve grants full control over the dynamic range:
- Mid‑tone safety: anchor points in the middle keep mid‑tones stable.
- Simultaneous adjustment of shadows and highlights without side effects.
- Greater creative flexibility for high‑contrast or muted looks.
Adopting the Tone Curve habit elevates your workflow and helps you develop a distinctive editing style.
With practice, the Tone Curve becomes an indispensable tool for photographers who demand precision and artistry in every shot.