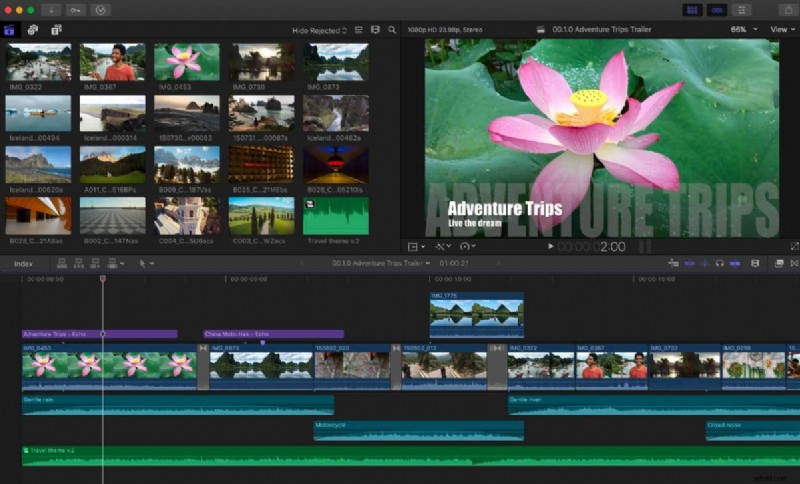
Mastering audio editing in Final Cut Pro is essential for professional video results. This guide will walk you through everything, from simple volume adjustments and fade transitions to using the powerful Audio Inspector for complex FCPX projects. Read on to learn all the essential steps for your Final Cut Pro audio workflow.
Final Cut Pro (or Final Cut Pro X) includes a complete set of audio tools for different needs. You can make quick changes like adjusting volume or add more advanced edits with effects and detailed controls. With these options, Final Cut Pro audio editing can take your projects to a higher level of quality.
For today's topic, you will learn how to handle basic clip-level edits and move into advanced features using the Audio Inspector. We will also recommend an easier option, which helps beginners or busy creators work faster on audio without losing quality.
Method 1: Basic Clip-Level Audio Editing in Final Cut Pro
Basic edits are the foundation of Final Cut Pro audio editing. These tools are quick to apply and solve common issues like unbalanced levels, abrupt transitions, or distracting background sounds.
If you are starting with how to edit audio in Final Cut Pro, clip-level adjustments provide a strong base before moving into advanced features.
Step 1
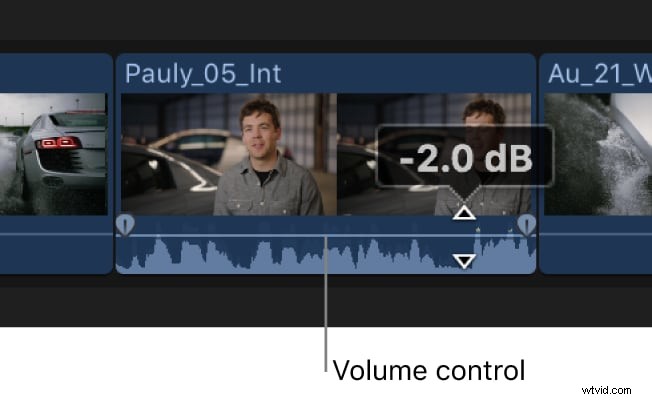
Adjust Volume in the Timeline
Each clip includes a horizontal line that represents audio levels. Drag it upward to increase volume or downward to reduce it. This helps balance dialogue, music, and effects for a clean Final Cut Pro mix.
Step 2
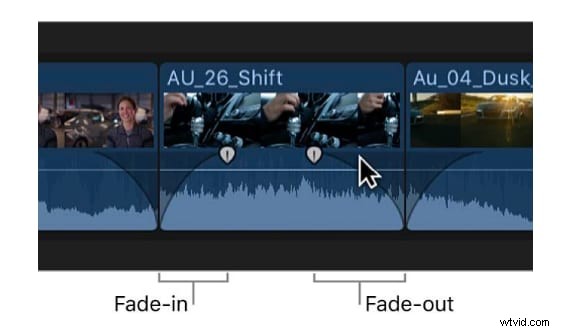
Add Fade-In and Fade-Out
Use the fade handles at the clip's start and end to create smooth transitions. Fade-ins help introduce background music, while fade-outs provide natural scene endings.
Step 3
Use Crossfades Between Clips
Apply a crossfade when two clips overlap to merge their sounds seamlessly. This technique eliminates abrupt transitions and ensures smooth, professional-quality audio blending.

Step 4
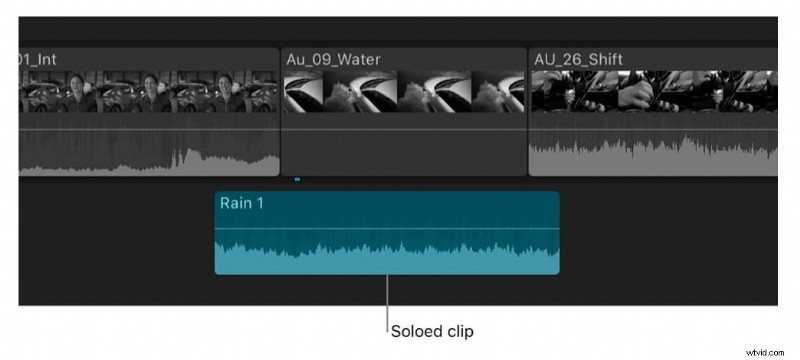
Mute or Solo Tracks
Mute temporarily silences a clip, while Solo isolates one track for focused listening. These tools are useful for diagnosing audio issues or fine-tuning individual elements in your mix.
Step 5
Adjust Pan and Balance
Use the pan control to move audio between left and right speakers, and adjust balance for even distribution. This adds space and clarity to your Final Cut Pro audio mix.
Method 2: Advanced Audio Editing with Final Cut Pro's Audio Inspector and Roles
After learning the basics, you can take Final Cut Pro audio editing further using the Audio Inspector and expanded audio components. These advanced tools provide detailed control over levels, effects, and output settings.
For more complex productions, Final Cut Pro X audio editing also ensures your mix is polished and professional.
Step 1
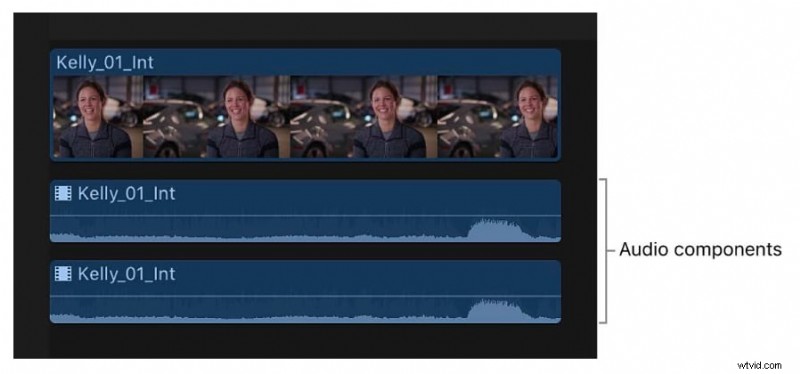
Expand Audio Components for Detailed Control
A clip may contain multiple channels, such as left and right dialogue, background noise, or music tracks. Expanding audio components allows you to edit each one independently—ideal for removing unwanted sounds or balancing layers in a complex mix.

Step 2
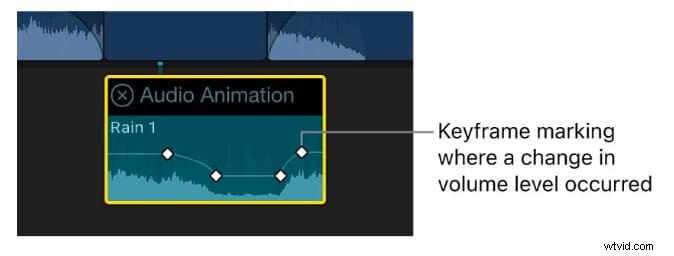
Use Keyframes for Dynamic Changes
Keyframes enable gradual changes in audio over time. For instance, lower background music volume during dialogue, then raise it afterward. This keeps voices clear while preserving the overall energy of your Final Cut Pro timeline.
Step 3
Apply Audio Effects
Final Cut Pro includes built-in effects like EQ, noise reduction, and reverb. EQ balances frequencies, noise reduction removes hums or static, and reverb adds space for a more natural sound—together enhancing your project's professional quality.
Step 4
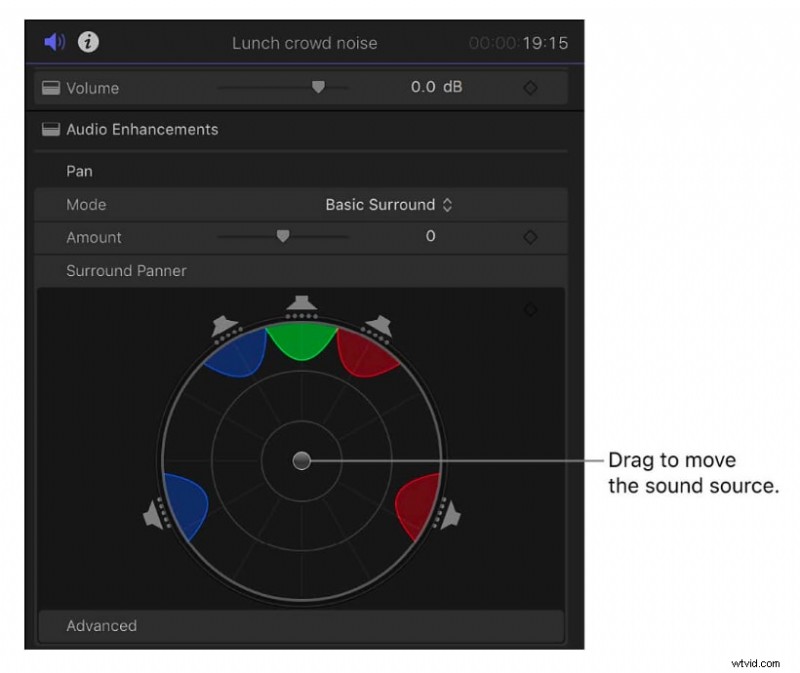
Configure Stereo, Mono, or Surround Channels
The Audio Inspector lets you switch between stereo, mono, or surround sound depending on your project. Choosing the right setup ensures consistent playback for online publishing, studio presentation, or immersive surround experiences.
Step 5
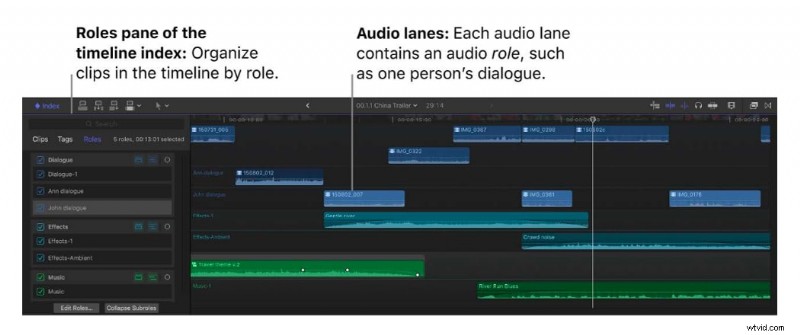
Organize Audio with Roles and Lanes
Assigning roles such as dialogue, music, or effects helps organize clips by type. Audio lanes visually separate these roles in the timeline, making large projects easier to manage and keeping your workflow efficient.
Best Alternative to Final Cut Pro for Simple Audio Editing
 Secure Download
While Final Cut Pro audio editing is exceptionally powerful, its advanced features often create a steep learning curve. For creators who need professional results without the complexity of FCPX, or want to clean background noise faster, Wondershare Filmora is a practical and intuitive alternative. It's designed to streamline the editing process without sacrificing quality, offering built-in audio tools that simplify common tasks.
1. AI Audio Denoise
AI Audio Denoise can automatically detect and remove unwanted background sounds such as fan noise, clicks, or static, improving clarity without manual adjustments.
2. Audio Equalizer & Effects
Filmora offers presets and manual controls to balance bass, mid, and treble, along with creative effects that enhance or stylize your sound.

3. Royalty-Free Music & Sound Effects Library
You can find a wide selection of tracks and effects you can add directly, saving time that would otherwise be spent sourcing external audio. Didn't find the audio you need? Generate it easily depending on the mood and genre you are after with AI Music, or make custom sound effects from text with AI Sound Effect Generator.
These features cover the most common audio editing needs in a straightforward way. For creators who want results without the complexity of Final Cut Pro audio, Filmora delivers speed, simplicity, and professional-quality output.
Conclusion
Learning how to edit audio in Final Cut Pro gives you full control over sound, from quick clip-level adjustments to detailed work in the Audio Inspector. These tools make it possible to balance levels, clean recordings, and apply creative effects for professional results. However, not every project requires advanced editing.
When you need a faster and easier workflow, Filmora offers practical tools like AI Audio Denoise, an equalizer, and a built-in audio library. With both options available, you can choose between the depth of Final Cut Pro audio editing and the simplicity of Filmora.

Filmora
AI Video Editing App & Software
Best tool for making videos anywhere for all creators!
Simplify all your steps in video editing, from the pre-processing to finalizing, Filmora AI stays tuned.