
HDR Photography has been around since the days of film, but has become extremely popular in recent years. High Dynamic Range, or HDR, is essentially a way of processing photos that allows for a wider and deeper range of colors. This type of processing makes an image appear much closer to what the human eye sees as opposed to what your camera’s sensor allows. In example, the photograph above shows the natural rich colors of the building as well as the natural rich colors of the sky. Without HDR, the sky could either be well exposed and the building silhouetted, or the building well exposed and the sky blown out. Creating an HDR photo however will allows both elements to appear natural and rich in color.
One method of making an HDR photograph is to combine multiple images with different exposures together. This tutorial will explain how this photo was created and in using the same process, how you can create your own HDR photos.
Step 1. Bracketing Your Subject
Bracketing is done when several shots of the same subject are taken with varying exposures. This can be used for almost any occasion or type of photography and is a good way to ensure that you’ve gotten the shot you wanted when you sit down to edit. For example, you will set your camera on a tripod and take one shot at 1/200 another at 1/400 and another at 1/80. Now you have 3 different shots of the same image, but each shot will have a different exposure. Each setting and subject will vary obviously when it comes to bracketing, but many cameras have a built in bracketing feature that will do the work for you.
For this photo there are only two key elements, the building and the sky. So the first shot that will be taken will be to get a proper exposure of the sky:
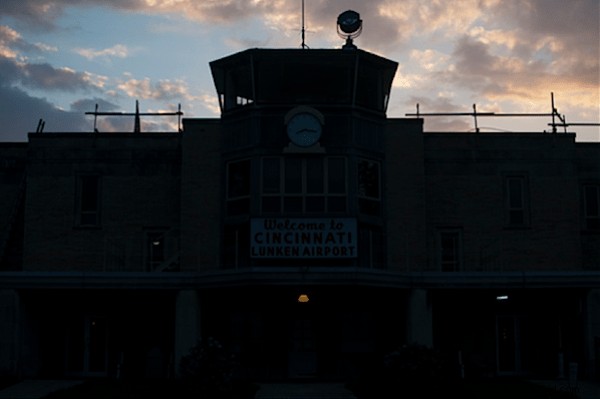
As was mentioned above, the sky is well exposed but the building is silhouetted. This was taken with a faster exposure to ensure the colors of the sky would be rich and deep as opposed to blown out.
Now the second shot will be taken to get a proper exposure of the building:
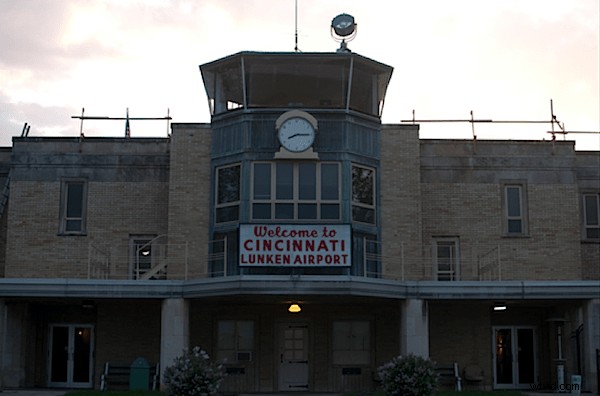
The building is well exposed in this shot, but again, the sky is blown out. This was taken at a slower shutter speed in order to reduce the silhouette effect the bright sky gives.
Now that we have our two images, we will combine them to get the best of both.
Step 2. Combing the Photos
Photoshop is a great tool to use in HDR photography because it is fairly easy to combine photos. So let’s bring both images into Photoshop.
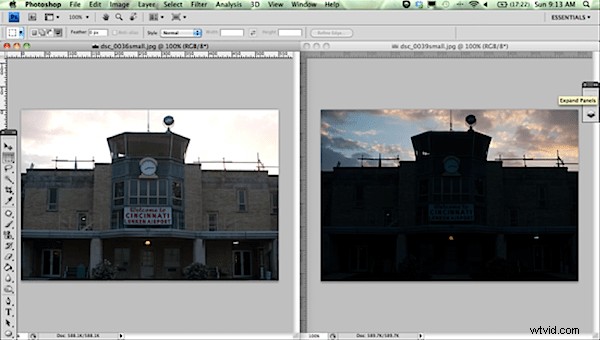
The photo with the correct exposure for the building (left) will be moved on top of the photo with the correct exposure for the sky (right).
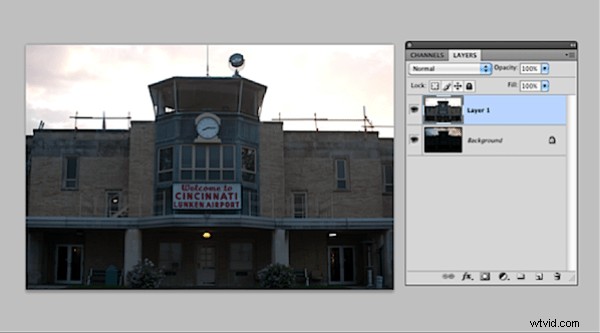
Now that the photos are layered on top of each other we will combine the two. Our top layer has a well-exposed building and a blown out sky, so let’s remove the sky of this image. In order to remove the sky we will first select the top layer, and then choose the magnetic lasso tool. With the magnetic lasso tool we will select the entire sky. This is where an ok HDR photo can turn into an awesome HDR photo. The more time you put into being exact and making sure that you don’t miss any pieces, the better and more natural your photo will look.
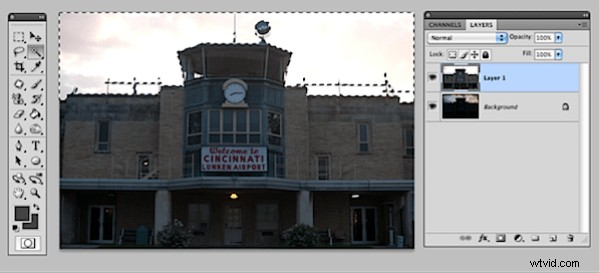
Then we simply hit the delete key and voila! Our well exposed sky replaces the blown out sky.
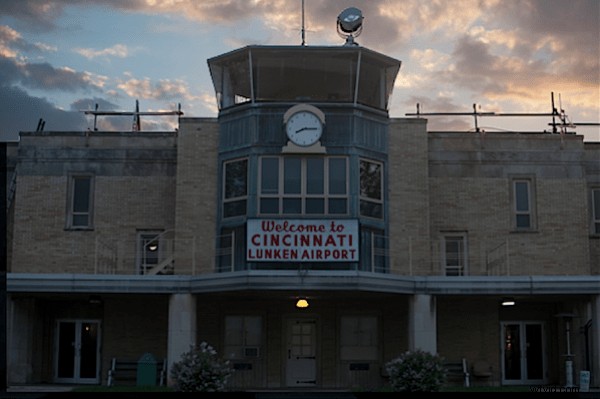
The photo is then put into Lightroom and edited a bit more…

HDR photography can have some amazing results if done correctly. The key is to not go to the extreme and combine dozens of photos leaving every pixel of the photo well exposed. Leave room for natural shadows and use moderation when combining images.
Nicholas Moeggenberg is a photographer from Cincinnati, OH and runs the photography contest – May the Best Photo Win.