Food photographer Steve Anderson successfully photographed 40 dishes in one sitting, here's how he did it
By Laurence Chen | Published Jun 3, 2011 8:01 PM EDT
For Los Angeles food photographer Steve Anderson, a new Scottsdale, AZ restaurant’s need for images of its complete menu offered him a challenge he couldn’t pass up. Why photograph every menu item? Because customers of the restaurant who would first be attending films at a neighboring theater would also be ordering dishes on iPad menus with choices beamed wirelessly beamed to its kitchen, and making their selections based on Anderson’s images. For Anderson, the creative challenges were both logistic and aesthetic. When bidding for the job, he knew he would have to devise an efficient system for handling a non-stop procession of food and drink. The system would have to allow him to style, light, and capture almost 40 dishes reflecting a vast array of colors and textures in single day—giving him an average of 12 minutes per subject. In Anderson’s favor: The restaurant’s chefs plated their own creations, and the food came straight from the kitchen, camera-ready.
A huge supporting cast helped with the logistics. The entire kitchen staff was at his disposal, including three chefs, three sous-chefs, and their assistants. The restaurant’s hostess managed the shot list and acted as a traffic cop. Serving staff moved dishes on and off the set, as well as cleaned up and staged backgrounds. “A nonstop supply of Red Bull helped, too,” Anderson says.
His lighting setup helped him with the aesthetic challenges. It consisted of a Profoto Pro-B2 1200Ws powerpack and a couple of strobe heads. He set one in a standard reflector. He aimed the other through a Matthews 8×8-foot white silk in a flexible frame.
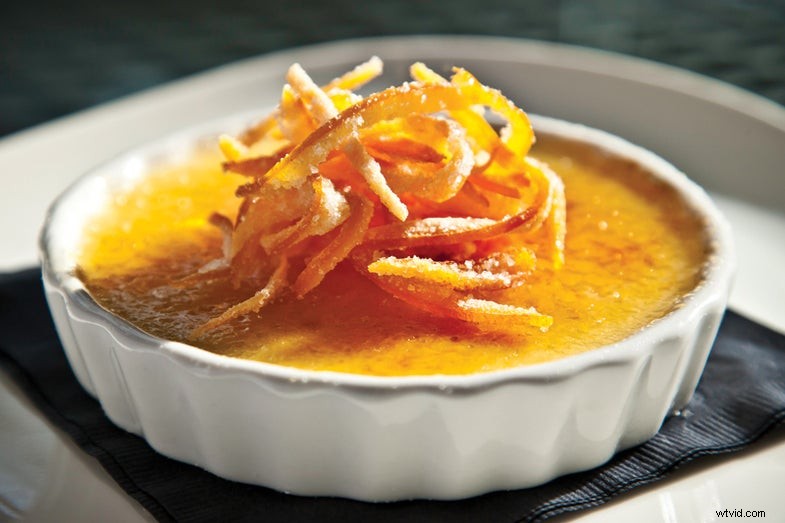
Look at his crème brûlée. The dish’s defining feature is its crispy, sweet top shell. Anderson’s unmodified, directional Profoto light accentuates the texture and the translucency of its glossy surface. Firing down and from behind on the right, this hard light also highlights the sugar crystals sprinkled on top. The softer light behind the silk, mounted straight up and down just off camera, provides subtle fill from the left. Looks good enough to eat, right?
His client agreed. After the first shoot, the restaurant hired Anderson two more times over the next six weeks. Sweet.