Bring out that beautiful blue sky by setting up your shot right before the sun goes down.
By Peter Kolonia | Published Apr 20, 2011 8:04 PM EDT
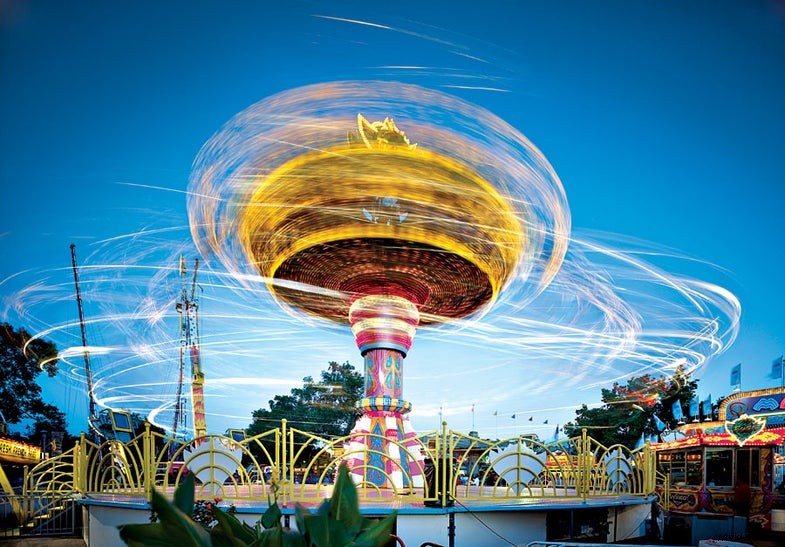
Summer is right around the corner, and for many photographers that means staking out amusement parks and fairgrounds for great images. Shots of rides at dusk, like David Bowman’s “Fighter,” above, are almost a sure thing. “Every year at the end of summer, about 2 million people attend the Minnesota Fair outside of St. Paul, including me,” says the Minneapolis pro. “In 2008, I was there for all 12 days, and shot with my Sinar P2 4×5 camera. I wanted big prints that showed every detail.”
Almost any DSLR could produce an image similar to this, however, especially if you’re satisfied with 11×14-inch prints.
To get an image like it, follow these simple rules:
Shoot during the “blue hour” of twilight.
Your window of opportunity is just about an hour, so work quickly to get in as many scenes as possible. Bowman starts as soon as the lights blink on.
Deal with the crowds.
Bowman strategically placed garbage cans around his camera position to prevent fair-goers from bumping his tripod or tripping over his cases. “I was accosted by people all night long,” he says. “While I was shooting the Fighter, for example, a kid came up and asked if my camera was a camera. I answered,’Yes.’ And he responded, ‘Actually, I was wondering if you had any gum.’ I used to dread the thought of making art in front of throngs of people. Not anymore.”
Check weather reports.
You’ll need clear skies to capture the luminous blue of twilight.
Bring the right stuff.
A tripod to stabilize the camera during multi-second exposures is absolutely necessary. Bowman also recommends a view camera or lens with tilt/shift capability (see page tk) so that you don’t have to point the camera upward and distort the lines of the amusement park rides.
Scout the night before.
Prime locations will have little foot traffic and should be physically close together so that you can quickly move from one to the next. Look for places where you can get your tripod-mounted camera above the heads of other fair-goers, either by placing it on a bench or stairs, or by clamping it to a stepladder. The best scenes will let you aim the camera in the direction of the setting sun for really colorful skies.
Shoot in RAW.
The color temperature difference between golden incandescent or neon lights and the cool blue of the daylight-balanced twilight sky is crucial to getting the background glow that you see here. Shooting in RAW will give you the greatest flexibility to fine-tune color balance in postproduction.
Bracket your shutter speeds.
Bowman tried shutter speeds from 1/60 to 5 sec and each produced a radically different look, each a success.