ND filters reduce the amount of light passing through a lens, making it easier to shoot in brightly-lit conditions. Let’s learn more in this guide.
What’s inside a camera bag can vary from shoot to shoot, but there are a few items that remain constant. Cameras and lenses are obvious must-haves, since without them a photographer or videographer is useless. But other staples include extra battery packs, an external microphone, and mountable light. Neutral Density (or ND) filters, however, are compact, inexpensive items that can have a considerable impact. ND filters are a videographer and photographer’s best friend when shooting in brightly-lit conditions.
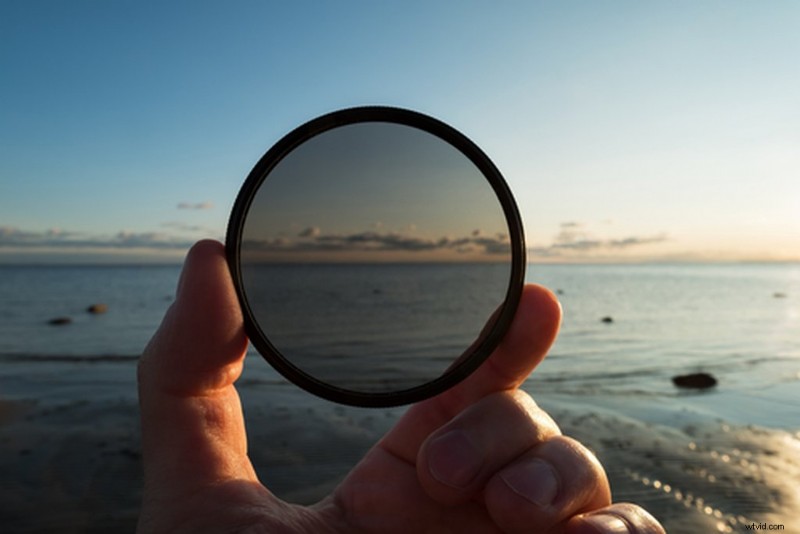
Although ND filters look the same as other filters, they don’t color the image. Instead, ND filters are more like shades for your lens. They allow your camera to capture gorgeous daytime shots without the need to adjust aperture, shutter speed, or ISO. Overexposed shots are a nightmare to fix when it comes time to edit, so it’s best to have an ND filter stashed away for sunny days.
What Are ND Filters?
The “ND” in ND filter stands for Neutral-Density. ND filters moderate the amount of light that passes through the lens, and are useful for both photographers and videographers. It’s a lot like a pair of sunglasses in that it blocks out or darkens the image to negate the effects of harsh light. There are some excellent options on Amazon or B&H Photography that are affordable.
Optical Density
Optical density on an ND filter measures the f-stop reduction of a particular filter, with higher-level filters blocking more light. Most manufacturers measure optical density by applying a number next to “ND,” such as ND2.
Starting from ND2, which is equivalent to one f-stop reduction and the lowest-level ND filter manufactured, each subsequent ND rating produces one more f-stop reduction. Using an ND2 filter with the aperture set to f/2.8 creates an image that appears as if it was shot with an aperture of f/4. Using an ND4 filter would be equivalent to two f-stop reductions. An ND8 filter would be comparable to three f-stop reductions, and so forth.
Using an ND rating to measure optical density is not the most intuitive measurement, since the ND measurement number doesn’t indicate the f-stop reductions. However, there’s a handy chart toward the bottom of the linked page that should help out. As a rule of thumb, each level lets in half as much as light as the one before — e.g., an ND64 filter lets in half as much light as an ND32 filter.
Why You Need an ND Filter for Photography
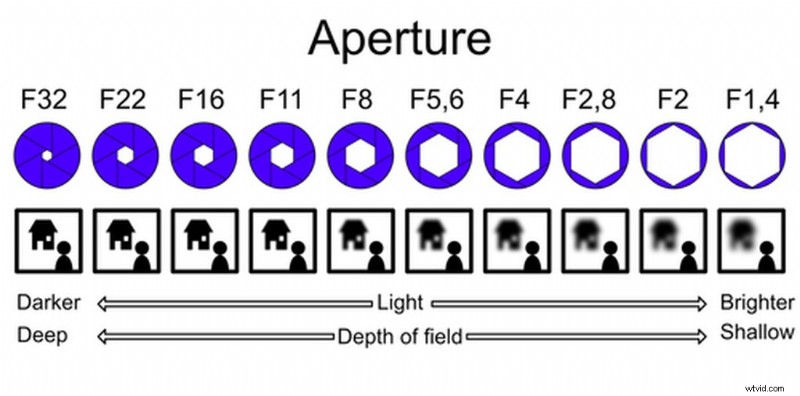
If you know your way around a camera’s settings, it’s possible you can adjust the shutter speed or aperture to counteract an overblown shot. But, doing so can limit the kinds of shots you can perform. For example, if you decrease your aperture to let in less light, you’ll miss out on a shallow depth of field, when the background appears blurry and out focus while the foreground remains sharp — also known as bokeh.
Another option would be to decrease the shutter speed, which affects photography and videography in different ways. In photography, decreasing the shutter speed instructs the shutter to remain open longer. However this can let in too much light, and thus overexpose the shot.
ND filters are useful for capturing images that require long exposure times. When photographing a body of water, for example, setting a long exposure time creates a smoothing effect that makes the water appear serene and glass-like. Leaving the shutter open for seconds, instead of fractions of second, is the only way to achieve this type of shot, since longer exposure times leading to smoother shots. Long exposure photography is hard to master, but the images are undoubtedly gorgeous.
The thing about long exposures, though, is that the shutter is open for so long that too much light hits the sensor, overexposing the image. That’s where ND filters come in. Applying an ND filter limits the amount of light hitting the sensor, so you can leave the shutter open for as long as you want, provided you have the right ND filter, without worrying about an overexposed shot.
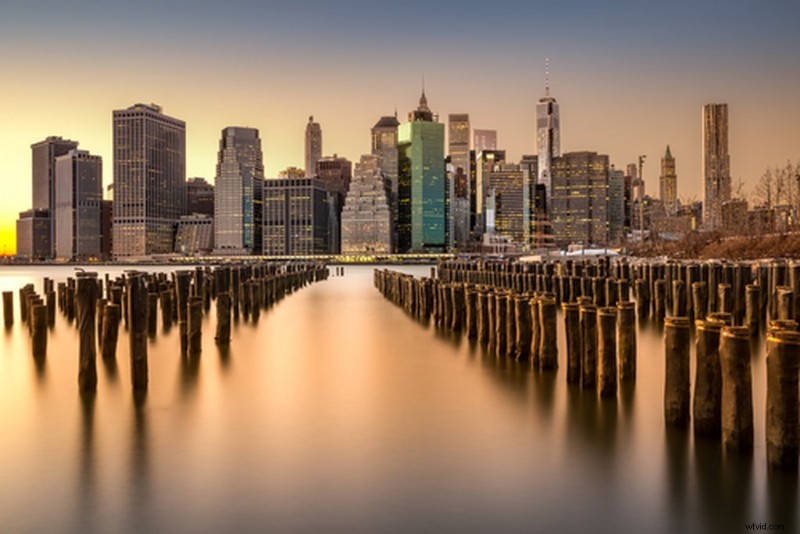
Image Quality When Using Higher ND Filters
To create images like the one above, though, you’ll need ND filters with a much higher optical density. One way to go about this is to keep stacking filters on top of each other until you reach your f-stop reduction goal. But, that’s costly and inconvenient. Stacking ND filters can also reduce image quality, with each added filter slightly altering the image.
The best way would be to purchase a single ND filter with a high optical density rating. It’s common to find ND filters with up to six or eight f-stop reductions, but anything higher is harder to find. ND filters above ND1000 (ten-stops) are known as extreme ND filters, and using them requires even longer exposures since these types of filters block out so much light. The NiSi filters app — Android and iOS — can help you find the right shutter speed for your ND filter so that your long exposure shots are correctly exposed.
Why You Need an ND Filter for Videography
Shooting video in broad daylight is challenging. You either have to adjust your aperture or shutter speed to get the shot you want, but that’s not always the best idea. Decreasing the aperture may let in less light, which is perfect when shooting in bright conditions, but it also eliminates the shallow depth of field, bringing everything into focus. If you need shallow depth of field in a shot, changing the aperture isn’t viable. That leaves changing the ISO or shutter speed instead.
Decreasing the ISO is one way to make sure your shot isn’t overexposed, since the ISO adjusts the sensor’s sensitivity to light. However, dropping the ISO to the lowest possible level will only get you so far. Your other option is to increase the shutter speed to let in less light. But, you may want to reconsider that once you know about the 180° shutter rule.
180° Shutter Rule
Most videos are shot with a shutter speed that’s twice the frame rate. If shooting at 24p, which is 24 frames per second, you’ll want to set the shutter at 1/50th of a second. This is known as the 180° shutter rule. Videographers use this rule because it closely resembles how the human eye perceives motion. This rule is not to be confused with the other 180° rule, which deals with where to place the camera when two subjects are having a conversation.
The slight blur when either the subject or the camera moves feels natural to those watching. Setting the shutter speed too low results in blurry shots, and setting it too high captures details too finely, which feels unnatural.
The 180° shutter rule is how you can achieve a more cinematic look, and it’s a rule that video professionals use all the time. Having an ND filter on your lens is one way to stick to that rule even when the sun is bearing down on your subject.
Which ND Filters to Buy
Professional-grade ND filters can cost up to $250 or more, but they’re not the only game in town. While Polar Pro and Tiffen are two big manufacturers, there are affordable options out there.
You need to know three things before purchasing an ND filter:
- The difference between fixed and variable ND filters,
- what’s a combo ND and CPL filter,
- and ND filter sizing.
Fixed vs. Variable ND Filters
There are two kinds of ND filters. Fixed ND filters have a set ND rating, such as ND2, so you’ll need multiple ones depending on the situation and shooting conditions. Variable ND filters are the most convenient, with the majority offering up to five ND ratings that are adjustable. But there’s a catch. Some variable ND filters create a vignette, which darkens the edges of the shot. Some variable ND filters also have a darkened diagonal line or cross, which makes them unusable.
In my experience with variable ND filters, I haven’t come across these issues, and I like having the freedom to adjust the ND filter on-the-fly. Not only are variable ND filters convenient, but they’re also more cost-effective. Instead of buying five ND filters at different ratings, you can have one ND filter with five different ND ratings you can quickly adjust. If you’re worried about the vignette or darkened cross issues, it’s best to stick with multiple, fixed ND filters, but it’ll be expensive.
Combo ND and CPL Filters
When I began looking into ND filters, I quickly found that I could get a combo filter that combined an ND filter with a CPL (circular polarizer/linear) filter. The CPL filter is a polarizing filter that makes the blue in the sky pop and eliminates glare.
If you’ve ever worn a pair of polarized sunglasses, you know that looking at a phone or TV is hard because the polarized lenses block glare and reflections. A CPL filter works in the same way, eliminating glare from glass and other surfaces. If your subject is inside a car you can use the polarizing filter to eliminate, or at least reduce, the glare. And, if you’re shooting outdoors, a polarizing filter brings out the blue in the sky, resulting in shots with magnificent blue skies.
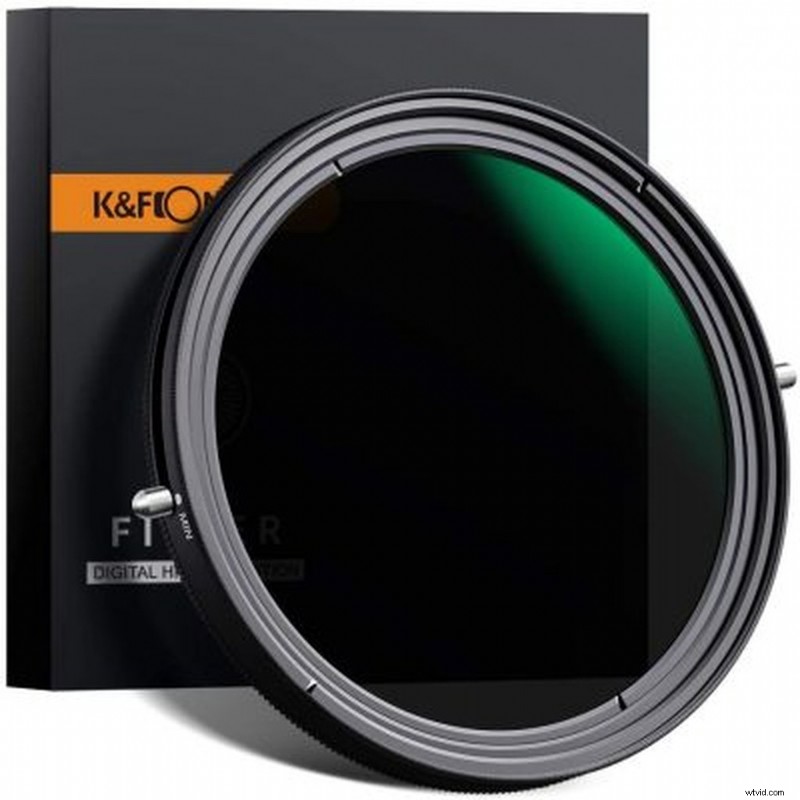
In my use, I’ve found that the CPL filter is lacking when it comes to eliminating glare. I’ve also noticed that the sky doesn’t appear as blue as I thought it would, but that’s my fault for believing the marketing. I bought the combo filter from K&F Concept Amazon, an ND filter manufacturer that sells extremely affordable ND filters. While I think the combo filter from K&F Concept does a great job of lowering the amount of light hitting the sensor, I wasn’t too thrilled with the filter’s polarization, or lack thereof. For those reasons, I can’t wholeheartedly recommend a combo ND and CPL filter. However, these issues may not be the case for combo filters from other manufacturers. Higher-quality combo filters may perform better, but it’s best to buy the filters separately.
Sizing and Step Up/Down Rings
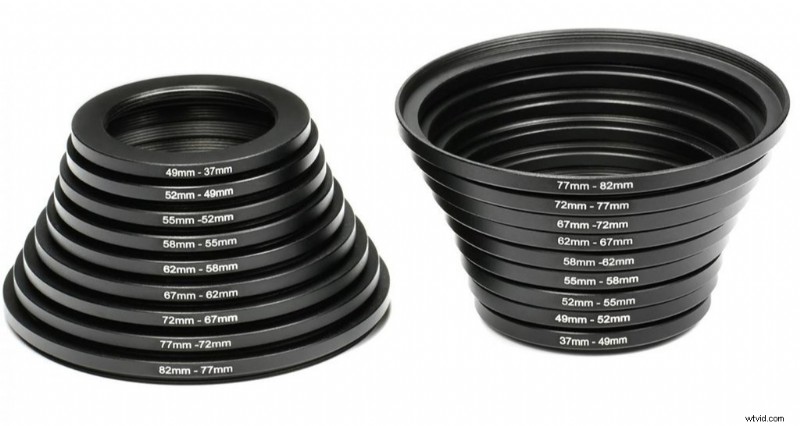
When purchasing an ND filter, you’ll notice another number, but this number is associated with the lens’s diameter. Each lens has a different diameter, which you can find by looking for a symbol that looks like a circle with a horizontal line running through it. My lens has a diameter of 49mm, so I bought an ND filter for that size, but it’s possible to use it on lenses with smaller or larger diameters thanks to step-down and step-up rings.
Step-down and step-up rings make it possible to use filters that aren’t compatible with your lens. These rings are inexpensive, and a must-have if you have multiple lenses with different diameters.
Which ND Filters Are the Best?
The Peter McKinnon-designed ND filters, manufactured by PolarPro, are $250. And, while they’re great products, they’re too expensive for most consumers, especially beginners and hobbyists. Instead, it’s worth looking into more affordable options. While a $50 ND filter won’t perform as well as one fives times the price, the difference in performance is unlikely to be significant.
If you have the money for a PolarPro filter, go for it! But, more budget-minded photographers and videographers may want to opt for something more reasonable. For example, Tiffen is a well-known brand that manufactures excellent ND filters at a reasonable price. Some of its variable ND filters sell for around $100, depending on the diameter.
I’ve found that ND filters manufactured by K&F Concept are some of the best-selling ND filters on Amazon, costing about $20 on the lower end. Even their variable ND filters, which tend to be pricier, sell for around $60. I own a combo variable ND and CPL filter, which costs $70, and it’s a good deal. I’ve used the filter to shoot in broad daylight and the difference is huge. Not bad for less than $100. If you’re just starting out, an affordable, albeit lesser-quality, ND filter is better than none.
Discover more video editing and gear tips:
- The 5 Best Fresnel Lights, Lenses, and Attachments
- How to Master the PC to Instagram Workflow for Posts
- Use These Inexpensive Hacks to Manipulate Your Video Lighting
- What Is HandBrake and How to Use It for Transcoding Video
- Shooting, Transferring, and Editing Footage On Location
Cover image via Huldiberdiev