Portrait photographers are obsessed with lighting, subjects, clothing, and hair, yet cropping often goes ignored. And that’s a mistake.
With the right portrait crop, you can elevate an image from mediocre to beautiful, and it only takes a handful of seconds. Of course, there is an art to cropping (you can’t just hack away with a crop tool and expect great results!), but that’s where this article comes in handy.
As an experienced portrait shooter, I’ve spent years developing my style, working with subjects, studying the masters, and discovering the types of crops that work – and the type of crops that don’t. Below, I share my top five tips for cropping portraits; by the time you’re done, you’ll know how (and where) to crop portraits like a professional artist.
Let’s get started.
1. When possible, crop in camera
Cropping in post-processing is great, and it certainly has its place; sometimes, you won’t recognize a brilliant composition until after the shoot is over.
But whenever possible, don’t wait until post-production. Instead, crop portraits right at the beginning, using your camera and lens to hone in on key features (and exclude the rest).
In other words: Compose your images exactly how you want the final shot to look, rather than shooting loosely and cropping in post-production. There are two reasons for this:
- First, images cropped in camera look totally different from images cropped in post-production. Filling the frame from the beginning means that you will create great background blur (bokeh), which removes background distractions and focuses more attention on your model. However, if you shoot wide and crop later, you’ll have a larger depth of field and less background blur.
- File size and image quality will not be affected. A cropped image may only leave you with 10-15% of your file size, so a file that was originally 30 MB as a full-sized image is reduced to 3 MB with a tight crop. These lower-resolution images have less detail compared to a full-sized image, and this has many consequences (e.g., your printing capabilities will be severely curtailed).
So whenever possible, get it right in camera. Yes, it can be tempting to leave some extra space, just in case – but be brave. Take the shot you envision as you envision it.
2. If it bends, don’t crop it
Many photographers struggle to determine where to crop portraits – the knees? The elbows? The waist? The chest?
Well, here’s my advice:
If it can bend, don’t crop it. If it can’t bend, cropping is (often) fine.
So the knees should not be cropped, but cropping mid-thigh works just fine (see the two images below). The elbows should not be cropped, but cropping just above the elbows looks nice.
 Bad crop Bad crop | 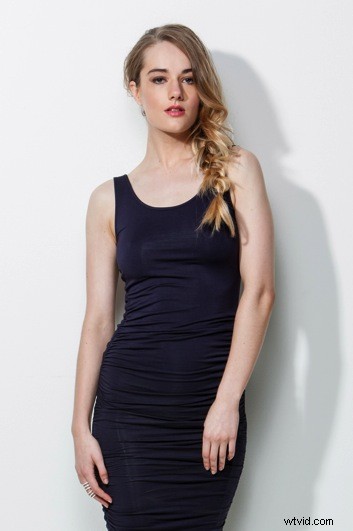 Good crop Good crop |
Before cropping – either in-camera or during post-production – ask yourself: Am I cutting off a body part that bends? And if the answer is yes, then I urge you to reconsider.
More generally, you should crop in a way that will elongate and flatter the body. Cropping at the knees, waist, elbows, toes, fingers, ankles, or wrists can make your model look stumpy. So be sure to avoid it!
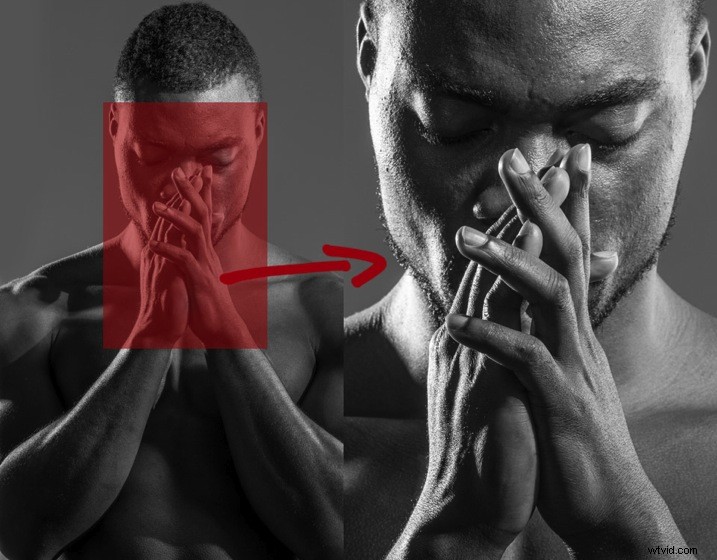
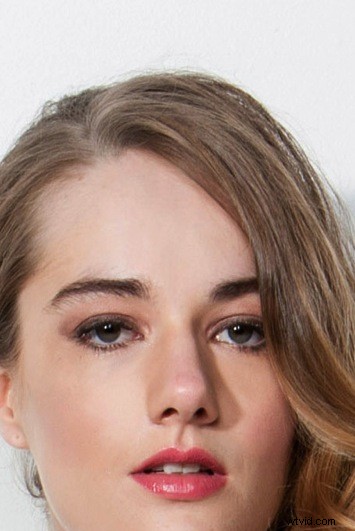
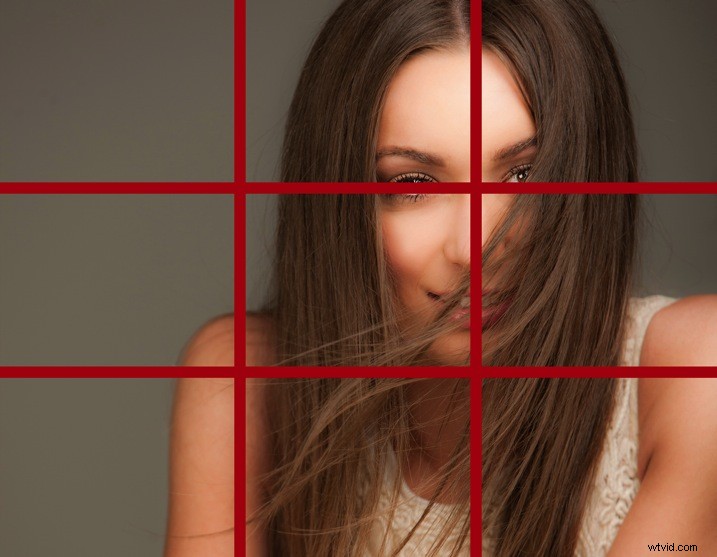
3. Avoid cropping into the chin; keep the eyes in the top third of the frame
Wondering how to crop headshots? I have two simple rules:
- Don’t crop the chin.
- Crop so the eyes fall in the top of the frame (and ideally along the upper-third gridline).
Cropping the chin will make your model’s face look square (see the example below), plus it often seems like you weren’t paying attention when you took the shot. Whereas keeping the chin in the frame results in a much more flattering image:
 Bad crop Bad crop | 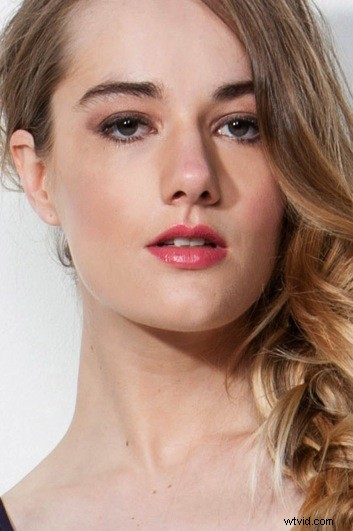 Good crop Good crop |
You must also think about the eyes, and I find that the strongest images tend to position eyes along the top gridline or slightly higher. In the left image of the woman featured above, the eyes are near the bottom-third gridline, and the shot appears static. But in the right image, the eyes are raised to just above the upper-third gridline, and the image comes to life.
Now let’s look at a simple portrait cropping example from start to finish. Check out this image, taken for the cover of my dPS eBook, Portraits: Striking the Pose:

I wasn’t sure how much of the shot we would be using, so I deliberately shot wide and left space on the left of my frame to allow for text and other images. But when it turned out I would need a horizontal file, I had to do a major crop; I considered both these options:
 |  |
And here are the images, now cropped:

Which do you prefer? In the end, I chose the image on the left, which positions the eyes on the upper-third gridline:
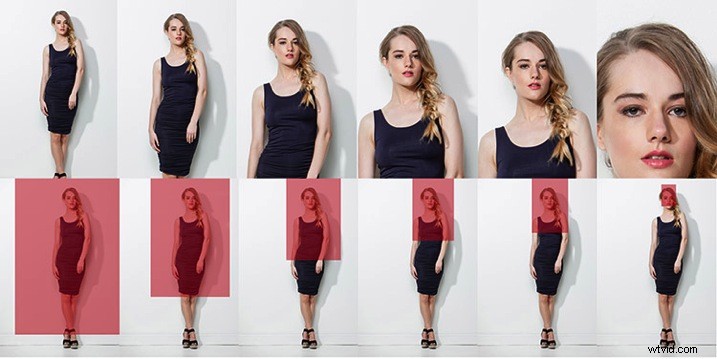
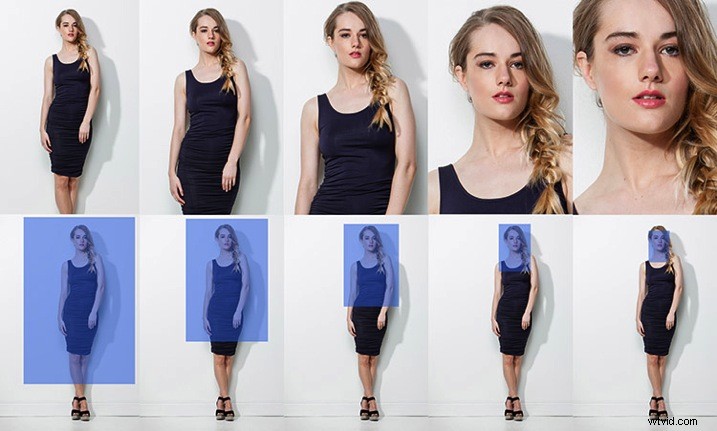
4. Give yourself options
The explosion of social media has radically changed how I shoot my portraits. A few years ago, I would shoot the majority of client portraits as vertical images. Now I make allowances for websites and social media platforms that run vertical, square, and horizontal images – and I recommend you do the same.
Instead of shooting vertical portraits for the whole session, go ahead and start that way – but then rotate your camera to shoot some horizontal frames.
Also, try out different in-camera crops. Experiment with different compositions. Put your model along the right or left gridline (the rule of thirds is always useful), but then try taking a few center shots. Also, try cropping your model’s head slightly (as I did in the previous example), but also shoot with some space.
Bottom line: Shoot a lot, including plenty of compositional and crop variations. You never know where the final image may end up in a few weeks or a few years, so I think it’s a good idea to plan ahead. It only takes a couple of minutes to shoot slightly wider, vertical, and horizontal at the end of each setup, plus this will give you more latitude when processing.
5. Make your crops deliberate (and don’t be afraid to break the rules)
One question I always ask myself when cropping images is, “Does this crop look deliberate, or does it look like a mistake?”
Deliberate crops are good. They give the viewer a sense of intention and even intelligence, whereas apparent mistakes make you look like an amateur. For instance, if you photograph a model wearing 3/4 sleeves and crop at a point that is technically correct, you’ll leave a tiny amount of arm showing just below the sleeve. This seems like a mistake and would look better if you cropped a little higher to remove the skin.
A key lesson is that cropping deliberately doesn’t always mean following the rules to the letter. Refusing to deviate from the rules I’ve laid out is a recipe for bad or unoriginal results, so use my suggestions as a starting point, then break them as you see fit. Not every experiment will work, but some will, and you can use these results to develop your own unique style.
The more you shoot, the more you will start to get a feeling for what looks right to you. If you’re still not sure, do two versions and compare them. Plus, you don’t have to experiment when cropping in camera. You can always take a few full-body or half-body portraits, then pull them up in Lightroom and have a cropping session. Make sense?
 |  |
Portrait cropping: final words
Hopefully, you now know how and where to crop portrait photos.
Remember to follow my suggested rules, but don’t be afraid to experiment, either. And have plenty of fun!
Here’s a simple cropping cheat sheet to get you started:
And here are the awkward crops to avoid: